
NOTE: This module works with UltimatePOS V2.11 or higher.
What is WooCommerce?
- WooCommerce is an eCommerce or Web Shop plugins for WordPress
- It is the most customizable eCommerce platform for building your online business.
- The advantage of using WooCommerce is – You can get LOTS of plugins are available which can help you setup different functionality as per your need. Also, lots of payment gateways, shipping gateways are present to help you easily setup payments
- WooCommerce is now the most popular eCommerce platform on the web (stats from BuiltWith), so you can rest assured you’re in good company.
What is WooCommerce Module for UltimatePOS?
WooCommerce module for UltimatePOS is a Separate Optional Premium Module for the POS application.
WooCommerce module for UltimatePOS is a simple module which when installed in your UltimatePOS software will help you with synchronizing products, stocks & orders. With this module, you open an online shop from your POS software in minutes and stop worrying about adding Products in multiple software, updating stocks, Orders & much more.
Features in WooCommerce module:
- Synchronize products categories from POS to your online WooCommerce based webshop. (POS to WooCommerce)
- Synchronize products from POS to your online WooCommerce based webshop. (POS to WooCommerce)
- Update stock details from POS to WooCommerce (POS to WooCommerce)
- Synchronize Orders from WooCommece to POS (WooCommerce to POS)
- Assign different price for the webshop. (Using Selling Price Group feature)
- Map taxes
- Shows the details synchronization logs.
- Auto Synchronization based on Cron jobs.
- Customizable products field for synchronization during product creation & update.
- Synchronize product price Including Tax or Excluding tax.
FAQ?
Q. When I install the WooCommerce addon, is it for my use only or is it available to my subscribers also?
- When you install WooCommerce module compatible with Superadmin you will get WooCommerce Option to create/edit packages in Superadmin.
- If a subscriber chooses a package with the WooCommerce feature enabled in it then they will see a WooCommerce option in the left sidebar. In WooCommerce menu they can add there WooCommerce store details and use it.
Q. Will this module also sync bookings?
- At the moment for the initial release, we have not added the sync for bookings.
- WooCommerce doesn’t have inbuilt bookings option with it.
- We will re-check if this is possible & if so, we will add this feature in future releases.
Installing the WooCommerce Module:
Installing the WooCommerce module to UltimatePOS is easy as cake. Make sure you meet the below requirements:
- Since this is not a standalone application you will need UltimatePOS (Download from here)
- UltimatePOS – Advance Version 2.11 or higher installed. For UltimatePOS installation step refer to this documentation.
Installation:
For WooCommerce module 2.0 or higher follow the instruction given in this link.
For older version follow the steps given below:
- Unzip the file downloaded from codecanyon.net. Inside that, you will find “WooCommerce” directory.
- Go to UltimatePOS installed directory. There you will find a folder named “Modules” (on the same level as app or bootstrap directory). If this folder is not present then create “Modules” folder (Make sure the folder name is exactly “Modules” with “M” in capital case). It should be inside the POS codebase, in the same level as “public” folder. (NOT insider public folder)
- Upload or Cut-Paste the “WooCommerce” directory inside this “Modules” directory.
- Open .env file. Inside that, you will find “ADMINISTRATOR_USERNAMES” configuration. Add the superadmin/administrator username in this option.
Example if “user1” is superadmin then:
ADMINISTRATOR_USERNAMES=user1 - Login with superadmin (username which is added in step 4). After Login, you will able to see the WooCommerce menu present in the sidebar. If not present them make sure the above steps are followed properly.
- If you pos is installed in www.example.com then go to www.example.com/woocommerce/install
- It will process for a few minutes and installation success message will be displayed.
Great, installation is done now.
API Settings
For connecting UltimatePOS to WooCommerce, we need to provide the API details of the WooCommerce shop.
- Generating API key: Generate API keys by following this instruction as given in WooCommerce documentation.
- In the permissions select Read/Write access.
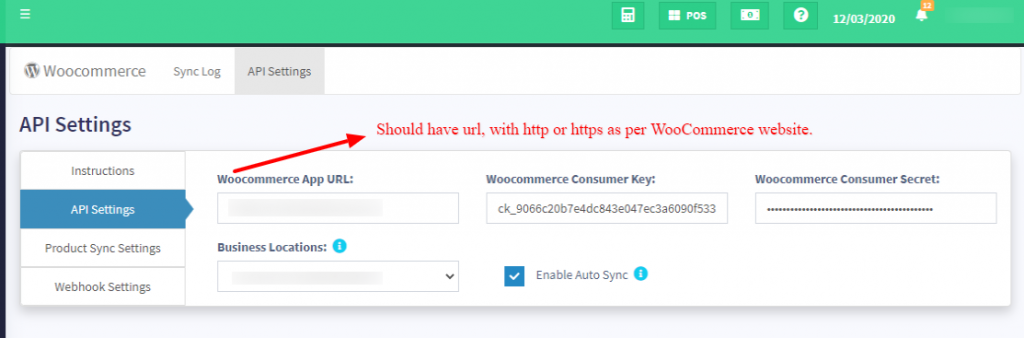
- Copy Consumer Key & Consumer Secret and paste them in Woocommerce Consumer Key & Woocommerce Consumer Secret.
- Woocommerce App URL: Enter the URL where WooCommerce shop is set up.
For example http://www.yourstore.com
or https://www.yourstore.com
IMPORTANT: Make sure to add HTTP or HTTPS before the woocommerce app url.
Enable Auto Sync:
- If you want the products/categories to be auto-synced then enable this option.
- By default, Auto Sync happens everyday night. It can be configured programmatically to make it more frequent. But more frequent means more server load.
- NOTE: Cron job needs to be added for this auto-sync to work. Cron command is shown in “Backup” screen
- Once auto-sync is setup the sync log in the woocommerce module will show the activity log with a regular time interval (the default time interval will be 12 hours).
Set Custom Time for Auto Sync:
- To change the default time interval you can follow the steps in the link – Link
Product Sync Settings
- Default Tax Class: WooCommerce assigns a tax class to each item. Here you have to provide the default tax class which is used inWooCommerce.
- Sync Product Price: This specifies if the product price which will be sent to WooCommerce will include tax or exclude tax.
- Default Selling Price Group: Sometime you may want to have a different price in WooCommerce then that is POS. For that, you can create a Selling price Group in POS & assign that price group for WooCommerce. Price Group Document.
- Product fields to be synced with woocommerce while creating products: Here you can select the fields which will get synced to WooCommerce from POS while creating a new product.
- Product fields to be synced with woocommerce while updating products: Here you can select the fields which will get synced to WooCommerce from POS while updating an already created product. This option can be very useful if you want the POS to overwrite some of the fields while updating products.
Using the Module:
After installation, you will find the WooCommerce menu at the bottom of the left navigation bar. Click on it & go to the Sync menu.
Here you will find the options to sync Categories, Products, Orders & Tax.
Sync Product Categories:
Click on this Sync button to synchronize the categories & Sub-Categories present in UtimatePOS to WooCommerce.
Map Tax Rates:
This option is used to map the taxes present in UltimatePOS to that of the taxes present in WooCommerce.
This is useful for adding related tax for a product during creation & updating.
NOTE: You must map the taxes before Synchronizing Products & Orders.
Sync Products:
- Make sure in the add/edit product(s) you have not checked the Disable Woocommerce Sync
- If you have multiple locations in UltimatePOS, then the location which is assigned to work with WooCommerce from (API settings -> Business location) should have the products assigned to it.
- Sync will work with Single & variable products only.
- Woocommerce can be enabled with only one location which you select in your API settings.
Synchronizing products is a time-consuming task and take up to 30 minutes or above depending on the number of products. Do not refresh or leave the page while synchronization is under progress.
Simple & Variable products synchronization is supported.
It has 2 options:
Sync only new products:
Using this option only newly created products in POS are created in WooCommerce. This option can be less time consuming, again it depends on the number of products.
Sync All:
Using this option all newly created products are created in POS & existing products are updated. Since it does both the operation of creation & updating it will be more time consuming than the previous option.
The number of products that are not synced will be shown as a popup message near the “sync product” button.
NOTE: The combo products will not be synced from UltimatePOS to woocommerce.
Sync Orders:
This option is used to get all orders in WooCommerce website to UltimatePOS.
All newly created or updated orders after the last sync get added to UltimatePOS. A special tag is also added to the order to mark it as an order from WooCommerce.
NOTE: The Order Sync feature will only sync orders created after the last successful sync
For eg)
If the last sync was done on 10-09-2025 at 05:00 PM.
And the next sync is performed on 20-09-2025 at 05:00 AM.
Then only the new orders created between 10-09-2025 05:00 PM and 20-09-2025 05:00 AM will be synced.
NOTE: Auto-sync not working:
Reason 1:
The auto-sync feature may not be enabled inside the Woo-commerce module.
Reason 2:
The cron job is not added.
NOTE: Orders going to draft:
Reason 1:
When order or sales from WooCommerce is synced with UltimatePOS, some orders may go to draft when the sufficient quantity is not available in UltimatePOS.
For example, an order from WooCommerce contains 10 Pieces of Pen, if only 7 pieces are available in UltimatePOS then instead of skipping the order, it goes to draft. With this, you can add a sufficient quantity of the products and make the order as final.
Reason 2:
UltimatePOS uses the below order mapping.
‘pending’ => ‘draft’,
‘processing’ => ‘final’,
‘on-hold’ => ‘draft’,
‘completed’ => ‘final’,
‘cancelled’ => ‘draft’,
‘refunded’ => ‘draft’,
‘failed’ => ‘draft’,
‘shipped’ => ‘final’
So, for example, if the order is pending in WooCommerce then it will be marked as a draft in UltimatePOS, similarly for other statuses.
NOTE: Automating Orders sync:
You can automate the order syncing by using the Order webhook described below.
Reset Synced Categories / Reset Synced Products:
When you click on sync Products it creates the product present in POS to WooCommerce. And with this, a link is established between the WooCommerce Products & POS Products.
Technically woocommerce products ID is stored in POS database to create a mapping between them.
After you have Synced the products if you click on “Reset Synced Products” then the link will be broken (technically the woocommerce product id stored in POS is deleted and set to null)
This reset is useful when you’re changing the WooCommerce Website.
After Reset if you click on Sync Products again then it will check for same products SKU present in WooCommerce, if not present then it will create the product and store the product id in POS.
Note: deleting of products in WooCommerce is not required if the SKU for products in WooCommerce & POS is the same.
Same applies to Categories also.
Using Order Webhook:
What is webhook:
Webhook helps you to get live orders from WooCommerce to UltimatePOS. Meaning whenever there is a new order in WooCommerce website it gets send instantly to UltimatePOS. This is a nice feature present in this module.
Setting up Webhook:
- Go to WooCommerce -> API settings -> WebHook settings, there you will find Order Created, Order Updated, Order Deleted, Order restored webhook settings containing Webhook Secret & Webhook Delivery URL

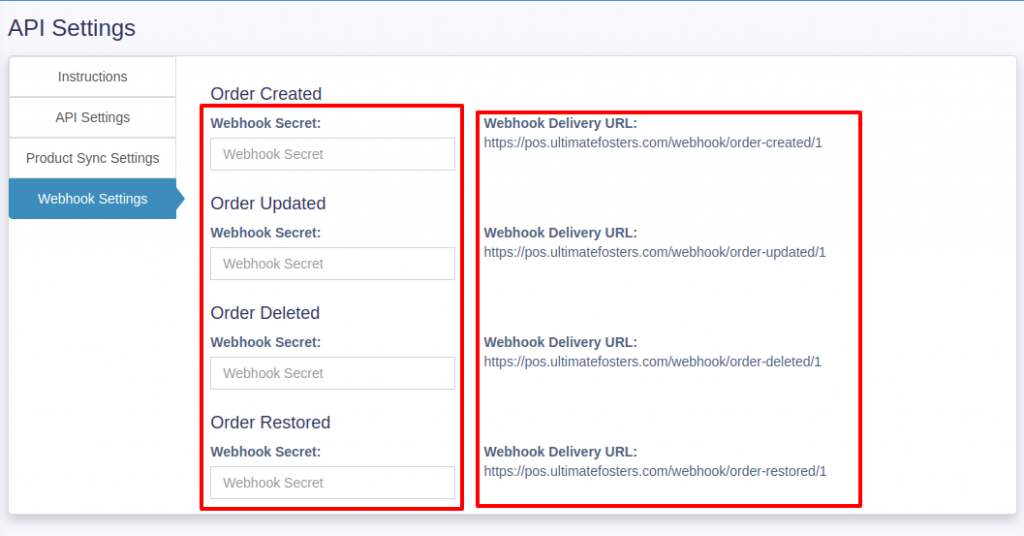
- Copy the Webhook Delivery URL for Order Created and create a new Webhook in WooCommerce. For creating Webhook in WooCommerce refer to this document: https://docs.woocommerce.com/document/webhooks/#section-3
- Name: Give any name which you can recognize.
- Status: Active
- Topic: Order Created
- Delivery URL: Paste the order created delivery URL from UltimatePOS.
- Secret: keep it blank.
- API version: WP REST API version 2
- Click on “Save Webhook” in WooCommerce.
- Copy the Generated “Secret” from WooCommerce and paste it to Webhook Secret of UltimatePOS Order Created.
- Repeat the above process for all other (Order Updated, Order Deleted, Order restored)
After configuring when a new order comes it will also be updated in UltimatePOS.
Error: Woocommerce webhook signature mismatch
If it shows this error in error log then make sure you have provided the correct webhook secret in UltimatePOS as described in above step 2.
Updating the WooCommerce Module:
For WooCommerce module 2.0 or higher follow the instruction given in this link.
Error & Solutions:
Error 0:
If the WooCommerce website is running in HTTPS, make sure the APP URL in UltimatePOS-WooCommerce module App Settings has HTTPS.
If WooCommerce is in HTTP, make the APP URL as HTTP.
Error 1:
Sometime during synchronizing you may get the following message/error
“live.EMERGENCY: File:………\vendor\automattic\woocommerce\src\WooCommerce\HttpClient\HttpClient.phpLine:375Message:Syntax error”
Solution:
In your WooCommerce “API Settings” change the “Woocommerce App URL” by adding “index.php” to it.
Example: Change the URL from
http://www.myWooCommerceStore.com to http://www.myWooCommerceStore.com/index.php
Error 2:
Sometimes in WooCommerce API bulk operations (add/edit/delete) are restricted. So it will give a error like
“Sorry, you are not allowed to batch manipulate this resource. [woocommerce_rest_cannot_
To resolve this error, follow this steps:
- Install & activate Code Snippet plugin in wordpress. https://wordpress.org/plugins/code-snippets/
- Go to Snippet -> Add New and add a new snippet
- The snippet will have below written codes:add_filter( 'woocommerce_rest_check_permissions', 'allow_bulk_operation', 10, 4 ); function allow_bulk_operation( $permission, $context, $object_id, $type ) { return true; }
- Save & Activate it.
Now it will allow the bulk operation from API.
If you want to understand it better, check this link: https://wordpress.org/support/topic/restrict-endpoint-on-woocommerce-rest-api/
Error 3: Image not syncing
Sometimes products don’t sync because of the problem in the images file name and image format.
Solution:
WooCommerce have some restrictions which can be fixed by following this:
- Disable image sync by going to
- API Settings > Product Sync Settings > Product fields to be synced with woocommerce while creating products
- API Settings > Product Sync Settings > Product fields to be synced with woocommerce while editing products
- Uncheck Image and save
- They try to sync again.
OR do this:
- Try replacing all product images to jpeg or png format.
- Shorten the file name length as well for the images.
Error 4:
Not syncing issue.
Solution:
Follow the below steps:
- Open the wordpress website .htaccess file
- Add this 2 lines in the very top of the htaccess file, similar to the below screenshot:RewriteEngine on
SetEnvIf Authorization .+ HTTP_AUTHORIZATION=$0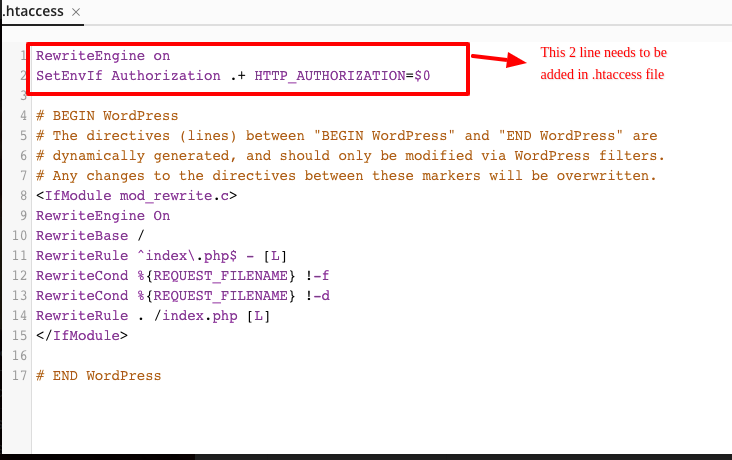
- After adding it, save the file and try to sync from UltimatePOS once again.
Adding/Editing custom Order status:
In WooCommerce you can add more order statuses. But in UltimatePOS we have mapped the default WooCommerce statuses to UltimatePOS status.
But you can easily add or modify this mapping.
Open this file: pos/Modules/Woocommerce/Utils/WoocommerceUtil.php
Search for the function: woocommerceOrderStatusToPosSellStatus
Change the status as per your need.
Status in left side(Key) is for WooCommerce & right side(Value) is for UltimatePOS.
Troubleshooting steps to be followed if synchronization doesn’t work
Check if the timezone of UltimatePOS matches the time zone of Woocommerce.
Check whether these permissions are set for Webhook.
- Go to Woocommerce > Settings > Advance > Rest API (Select Rest API here)
- Enable Read/Write permission for User
- The WordPress permalinks option should be set to “Post Name”
- If still doesn’t work try to reset the permalink.
Version Log:
V 5.1 – Released June 20, 2024
- FIX: Fix the install issue
V 5.0 – Released June 7, 2024
- NEW: Updated as per new design.
NOTE: You must update UltimatePOS to V6.x before updating the module to this version.
Released V 4.1, January 29, 2024
- IMPROVEMENT: Removed deleted product variations from showing in the not synced product count.
- Other minor fixes & improvements.