
Any contact can be supplier, Customer or Both (Supplier & Customers)
Adding Suppliers & Customers
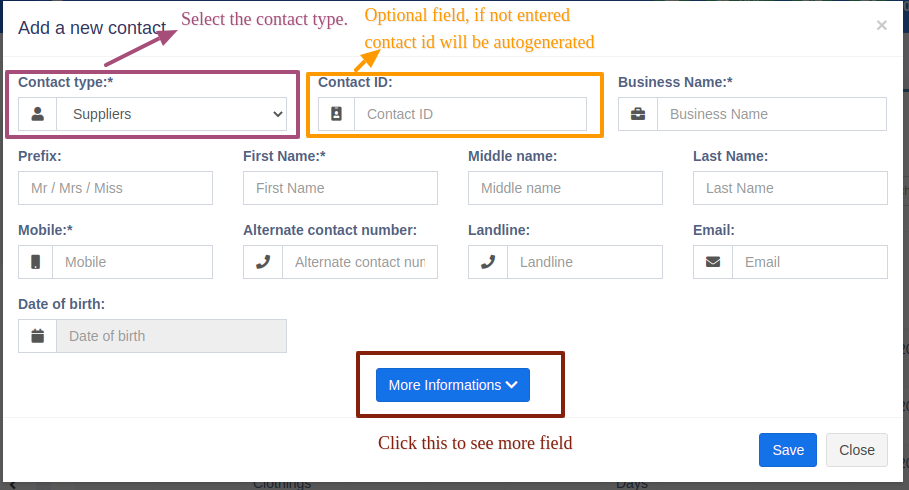
- Goto Contacts -> Suppliers or Customer
- Click on add new contact. Select contact type – Supplier/Customer/Both
- Based on the contact type selected – it will show the relevant fields. Fill the relevant details.
- Click on More More Information button to see more field.
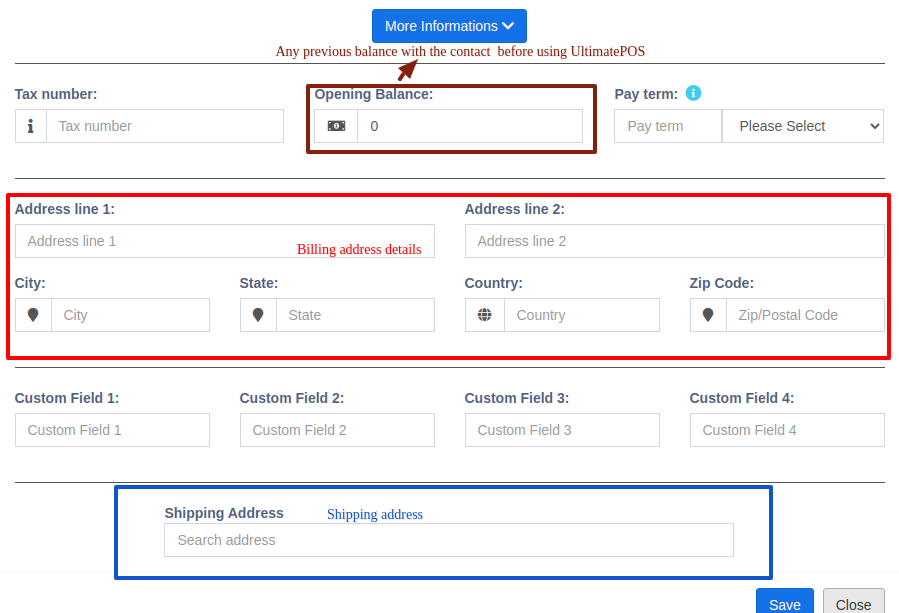
- Pay Terms: This will help the system to notify you of any pending payments for suppliers & customers. You can specify pay term in either days or months.
- Customer Group: Read details here.
- Credit Limit: This is the maximum amount of credit that can be given to the customer. If in any sales the credit exceeds this amount then it won’t allow selling on credit.
- Opening Balance: Opening balance of a customer or supplier before you start using UltimatePOS. So if there is any previous balance you can add here.
- Advance balance: Sometimes customer/supplier pay/takes money in advance. This wil show the amount of advance balance paid or take by the customer/supplier respectively.
Viewing Suppliers & Customers
- To view details about a Supplier or Customer click on View button. It will show the complete details along with the relevant transactions (Purchases & Sales) for that contact.
- Pay Due amount: You can use this button to pay the due amount for a customer or supplier. This will pay the overall due amount for all invoices.
Assigning Contacts to Users
You can assign contacts(customers & suppliers) to a particular use by following the steps below.
- In your pos\config\constants.php change the value of enable_contact_assign to true.
- When adding the user check the label “assign to specific contact”.
- Now when adding contact select the user to whom you want to assign.
Changing default customer name
If you want to change the default customer name “walk-in-customer” to something else follow the steps below.
- Go to the database contacts data table.
- Change the first name field to anything required.
Credit Limit for Customer
Credit limits can be added to customers.
When the credit limit is reached the partial or credit sale can’t be sone for those customers.
To set the credit limit Go to Contacts > Customers > Action > Edit > More Information > Credit Limit.
Set this field blank for not having any credit limit for customers.
NOTE: Do not set the credit limit as 0 for having no credit limit.
Credit Limit = 0 (the credit for the customer is 0)
Credit Limit = blank (no restriction for credit limit(infinite))
Supplier Stock Report
The Supplier Stock Report displays the current stock of products purchased from a specific supplier.
This helps track:
- Supplier-wise stock availability
- Products purchased from each supplier
- Remaining stock from supplier purchases
How to View Supplier Stock Report
- Go to Contacts → Suppliers List
- Click the Actions dropdown for the required supplier
- Select Supplier Stock Report
Why Stock Quantity Differs Between List Products and Supplier Stock Report
The stock quantity may vary between List Products and the Supplier Stock Report because both display different types of stock data.
List Products
- Displays the total current stock available in the inventory
- Includes stock purchased from all suppliers and stocks added by opening stock
Supplier Stock Report
- Displays only the stock of products purchased from the selected supplier
- Does not include stock purchased from other suppliers
📩 Still stuck? Contact Support