
HRM Module in UltimatePOS:
The HR module in the UltimatePOS system is loaded with features to handle all aspects of personnel management, including recruitment payroll, attendance, leave management, setting sale targets along many other critical operations.
Note: This document explains the HRM (Human resource management) feature in Essentials module. For other feature in Essential module refer here.
After you have installed & configured Essentials module you will see the HRM menu along with Essentials menu in the left sidebar.
HRM modules consist of:
- Leave types & Leaves.
- Attendance
- Payroll
- Holiday
- & related settings
Leave Management:
- Add leave: Leave Type(dropdown list), Start Date, End Date, Leave type, Reason (text area)
- Default status of a leave added is pending
- Admin can change the status: status(pending, canceled, approved) by clicking on the leave status column button.
- Inbuilt app Notification will be sent to admin when a new leave is added.
- Inbuilt app Notification will be sent to the applied user when the status is changed by the admin.
- Only admin can delete a leave.
- Reference no. Will be generated automatically for every leave to uniquely identify them. You can change the reference no prefix from HRM -> Settings (Leave Reference No. prefix)
- Leave Instructions: You can enter special instructions for users before applying for leaves from the settings “Leave Instructions” field.
Leave types
- Only admin can manage leave type (add or edit)
- Fields:
- Leave Type: Enter the name of the type of leave.
- Max leave counts: Maximum number of leaves allowed for the leave type.
- Leave count interval: This can be “Current month” or “Current financial year” or “None”. It is the interval for the maximum leave counts.
For example: If employees can take 12 Sick Leave in 1 year then:
Leave Type = “Sick Leave”
Max leave counts = 12
Leave count interval = “Current financial year”
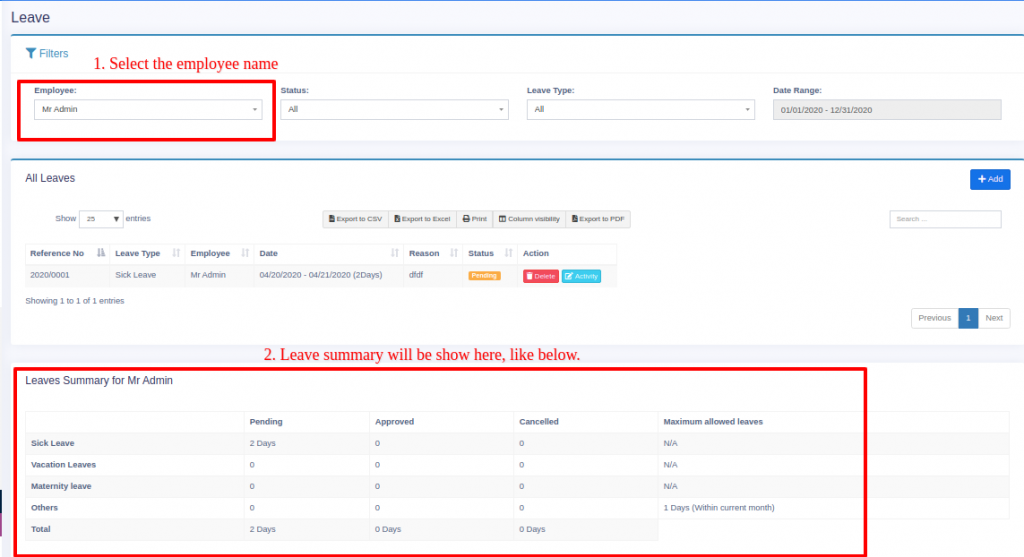
Leaves Summary for an user
- For admin: Admin can view leave summary of all other users. On the leaves page filter by an employee name and it will show the summary at the bottom of the page.
- For Users: Always visible to a user his/her summary.
Leaves Approval for an user:
When an user applies a leave, the admin can approve or cancel it.
To do this,
Step 1: Go to HRM Module > Leaves.
Step 2: Here you can edit the status of the leaves.
Approval of Additional leaves:
If users apply additional leaves than the limit permitted by leave type, these leaves can be approved by enabling the “Approve Additional Leaves” checkbox.

🎥 Video on leaves management
Attendance Management:
Attendance by admin & other users
- Users can add their own attendance, admin can add the attendance of every user.
- Attendance fields for admin: Employee, Date, Ip address(auto get the user’s IP address), note, clock_in_time, clock_out_time.
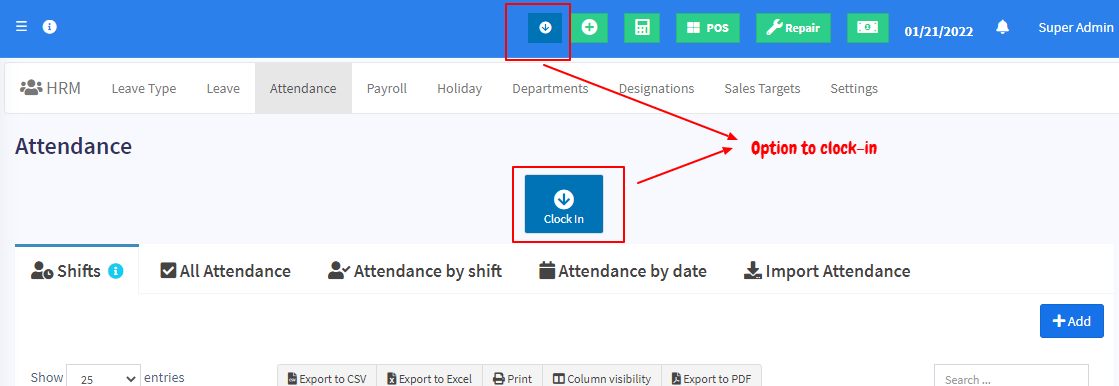
- Attendance by non-admin users: Users can add their own attendance by clicking on the “Clock In” button present in the top navigation bar and clock-in adding a note. And click on the “Clock Out” button before leaving the workplace for checkout and adding a clock-out note.
- Total work hours will be displayed when the admin selects a particular user and it is always visible to a non-admin user.
- If the admin wants to add attendance for users & don’t want the user to add their attendance then it can be disabled by unchecking “Allow users to enter their own attendance”
How can users add their own attendance:
Follow the steps below for users to add their own attendance
Step 1: Enable the “Allow users to enter their own attendance” in the User Management > Roles for that particular user.
Step 2: Log in with that particular user’s login details.
Step 3: In the attendance tab, the user can now clock-in and clock-out, thus marking their own attendance.
Grace Time:
- Grace time is useful for fixed shifts.
- Grace before check-in: Is additional time that is not counted as overtime. Meaning if Grace before check-in is defined as 30Min & a shift starts ar 11 AM, then even if someone check-in at 10.30 AM it’ll not be considered as early checkin
- Grace after check-in: Similar to before, this is time that is not considered as late even after checking at late. If Grace after check-in is 30 Min, then doing a check-in at 11:30 AM will allowed.
- Grace before checkout/Grace after checkout: Same as above 3 & 4, but this applies to check out timing.
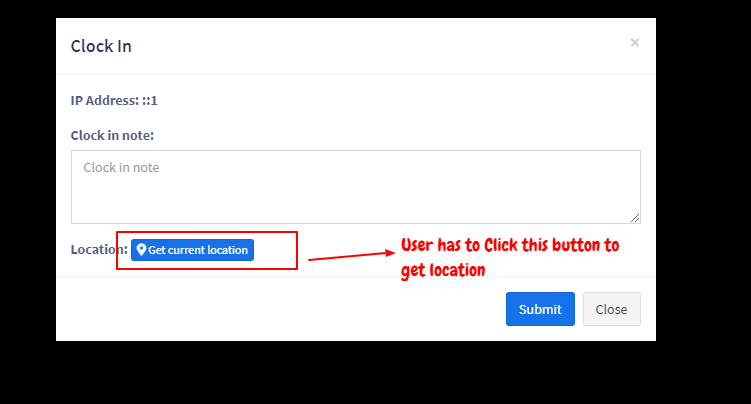
Getting the user’s location in attendance:
When a user/employee clock’s-in the system can save the user’s location from which he/she has put attendance.
NOTE: For the location to work your website must be HTTPS
- Enabling Location:
- Go to HRM -> Settings -> Attendance Tab.
- Check the “Is Location Required?” checkbox & save it
- Check the below screenshot for locations when adding clock-in
How accurate is the location?
Accuracy of Location depends on the API & device(mobile or laptop) used and not on the application.
Mobile: mobile has GPS enabled so the coordinates sent by them is more accurate
Laptop: Most laptops don’t have GPS enabled so the location is based on the IP address, which is not much accurate
UltimatePOS comes with 2 map API integration
- Free Open street map: It’s completely free and not much accurate. It does not require any additional configuration since it is integrated by default.
- Google map: Paid API and is 100% accurate. This needs additional configuration steps for accessing the location.
To enable google map API to follow the below step.
Open the .env file and update the GOOGLE_MAP_API_KEY=””.
Note: The updated google map API key should have geocoding enabled.
Biometric Scanner Integration in Attendance:
If a biometric system is used for attendance, then the data from the excel file exported from the biometric system can be fed into the downloaded template file. The complete data can be then imported into the POS system.
Use the import attendance feature to achieve this.
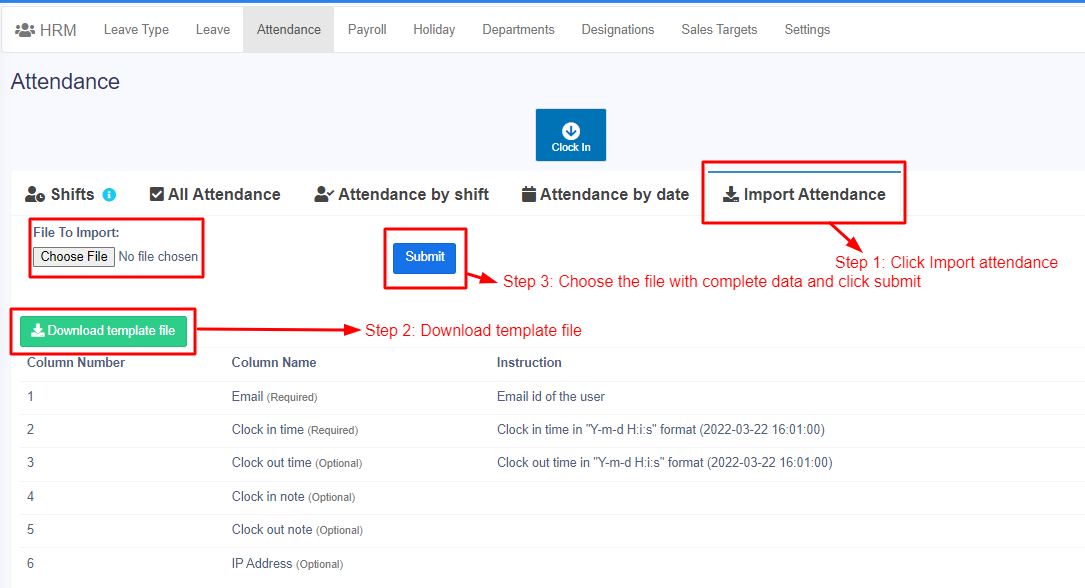
Notes:
Sometimes, you may have an issue with import attendance due to an incorrect date format in the imported Excel sheet. Check the below conditions and ensure that the format is correct
- The clock-in & clock-out should be in the format “Y-m-d H:i:s” ex: (2023-06-04 21:13:55).
- The format type of clock-in & clock-out should be in text format in the Excel sheet.
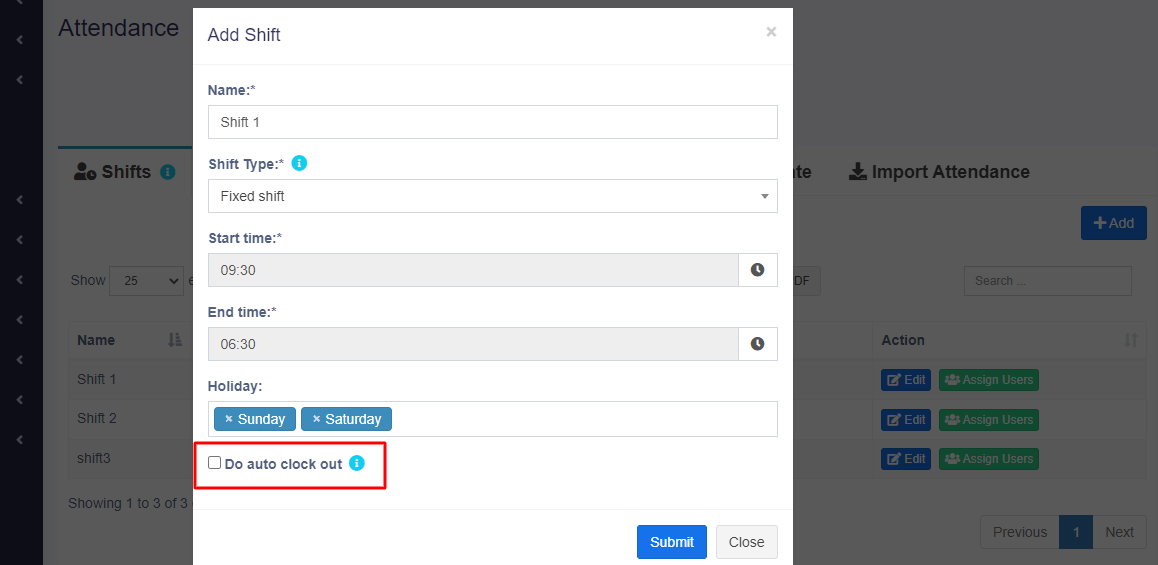
Shift management:
There are two types of shifts that you can create for users.
Fixed shift:
- With the fixed shift, you can create shifts with a specific starting and ending time.
- Therefore users can clock in only at a specific time.
- If users try to clock in or clock out at a time later or earlier than the specified time it will show an error message.
Flexible Shift:
- With the flexible shift, you can create shifts without specific timing
- Therefore users can clock in and clock out at any time.
Assigning shifts to users:
The created shifts can be assigned to specific users, so when users log in they can clock in for the shifts assigned for them.
Click the assign users button for a particular shift and assign shifts for users at particular dates.

ERROR: No active shift at this time
Sometimes while users try to clock-in, it may show this error.
This is because there are no fixed shifts available for that time when they login.
In such conditions you can either manually add the attendance for such users in the attendance tab.
Refer to the video given for more information – Video Link
Conditions to Check While Clocking In Using a Fixed Shift
- Ensure that the user clocking in is assigned to the fixed shift on the specific date.
- Before logging in, verify the system time and date on the POS screen.
- Check if the user is clocking in at the correct time specified in the fixed shift or within the allowed grace time range.
- Always set a grace period for the fixed shift, allowing users to clock in or out a few minutes earlier or later if they miss the exact time.
Auto clock out option:
By enabling this option the system will automatically end the shift for users and they can automatically clock out.
Please watch the below view demonstration for details of attendance & shift management.
Video Demonstration
Payroll Management:
- Only admin can add payroll & other users can view only there own payroll.
- Reference no. will be generated for Payroll. You can change the Payroll Reference No. prefix from settings.
Adding Payroll
- For adding payroll click on Add button in payroll menu.
- Select Employee and the month/year of payroll.
- If any existing payroll for the period then it will be shown for editing or new payroll can be added.
- Fields:
- Total work duration: Duration of work will be auto-calculated based on attendance
- Duration Unit: Unit of work like month/hour/week or other.
- Amount per unit duration: Price per duration.
- Total: Total work duration x Amount per unit duration
- Allowances: add as many allowances you have for the employee. Allowances will be added in final payroll.
- Deductions: add deductions for the employee. Deductions will be subtracted in final payroll.
- Gross amount = Total + Sum of Allowances – Sum of Deductions
- Inbuilt app Notification will be sent to the user when payroll is added.
Editing Payroll
To edit a payroll, click on ‘All payroll groups’ tab -> Action -> Edit
Making Payment for Payroll:
To make payment for a particular payroll, Go to Payroll -> All payroll groups.
Click on the action button -> Payment.
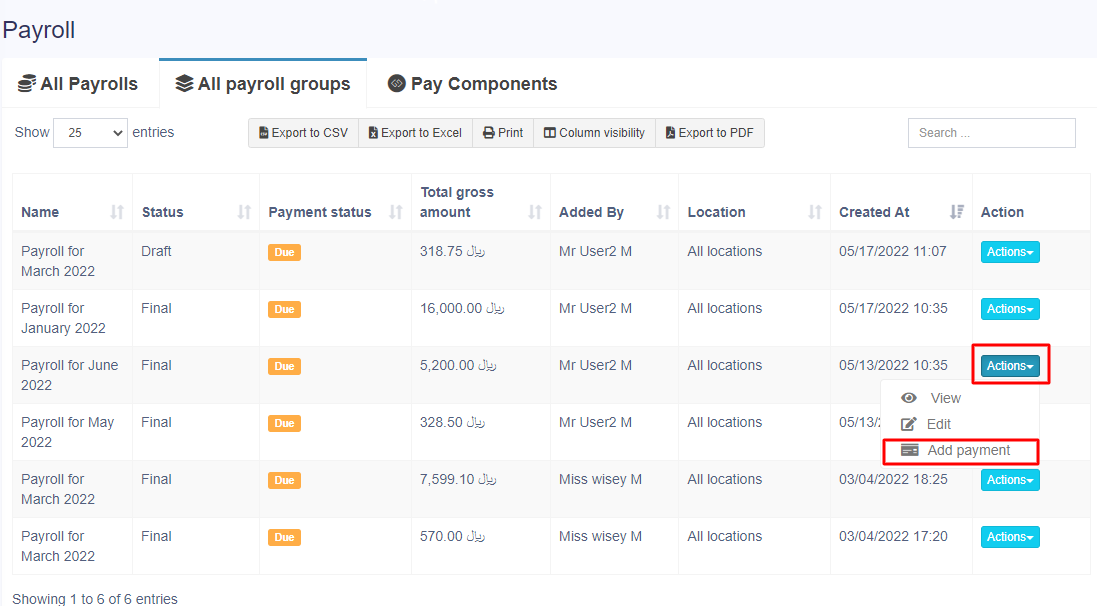
Making Partial Payment for Payroll:
If you want to add a partial payment payroll for all employees or a group of employees follow the step below.
Step 1: Navigate to the Payroll section and select the “All Payroll Payment” tab.
Step 2: Click on “Actions” and choose “Add Payment” for the specific payroll you want to make payment for.
Step 3: You’ll be directed to the payment screen, where you can enter the required amount.
Step 4: Click “Save” to confirm the partial payment.
Step 5: If you wish to add the remaining amount later, repeat the same steps mentioned above.
NOTE: While adding payroll payments, you can include payment notes. For instance, if you’re making the first due payment, mention it in the payment notes.
Adding Bulk Payroll and Bulk Payment for Payroll:
If you want to add a bulk payroll for all employees or a group of employees follow the step below.
For example: If you have 100 employees then you need to enter 100. You should have a bulk pay option.
While adding payroll, select all the employee names for bulk payment.
After adding the payroll, go to the ‘All Payroll Groups‘ tab where you can find the payroll as a group to add the bulk payment.
Adding Bonus in Payroll:
While adding a payroll, add a description “bonus” and add the bonus amount.
This way you can add the bonus amount with the payroll.
Holidays Management:
- Only admin can add holiday.
- Other users can view holidays applicable for there location.
Adding Holidays
Fields: Name, Start Date, End Date, Business Location, Note
Permission & Settings for management for HRM
Approve Leave:
By default only admin can approve leave added by other users. But you can assign the Approve leave permission to any other role & assign it to a user. User having approve leave will be able to approve leaves added by other users.
Allow users to enter their own attendance:
You will find this option in HRM -> Settings -> HRM tab. If enabled other users will be able to enter their own attendance and vice-versa.