Installing UltimatePOS
Server requirements
Make sure your server meets the following requirements:
- PHP Version – UltimatePOS Version 5 or higher PHP >= 8.1
- OpenSSL PHP Extension
- PDO PHP Extension
- Mbstring PHP Extension
- Tokenizer PHP Extension
- XML PHP Extension
- cURL PHP Extension
- Zip PHP Extension
- GD PHP Extension
Server Recommendation
- Ultimate POS can be installed in Localhost.
- If you want to make it accessible online- We recommend using Cloud host – as it provides better flexibility or control of the server. You can use AWS or Digital Ocean or search for some others. Our demo site is set up on the Digital Ocean.
- You can also use Shared hosting. Like for example BigRocks, NameCheap, GoDaddy etc.
STEPS TO INSTALLING POS SYSTEM
- After downloading, extract the file onto your desktop using a zip software (like winzip or winrar or something else ) as shown below.
Installing in Localhost:
- In case you want to install the system locally, here are the steps:
- 2.1 Download & Install a server like WAMP(for Windows) or XAMP(for windows or Linux) or something else as per your preference having Apache or nginx server.
- 2.2 Go to the htdocs folder. htdocs folder is commonly present inside the xamp/htdocs.
- 2.3 Copy the codebase folder (For example UltimatePOS-CodeBase-V2.8.1) present inside the unzipped file in step 1.
- 2.4 Rename the folder to UltimatePOS. (For example: UltimatePOS-CodeBase-V2.8.1 to UltimatePOS)
- 2.5 Now open http://localhost/UltimatePOS/install or http://localhost/UltimatePOS/public/install
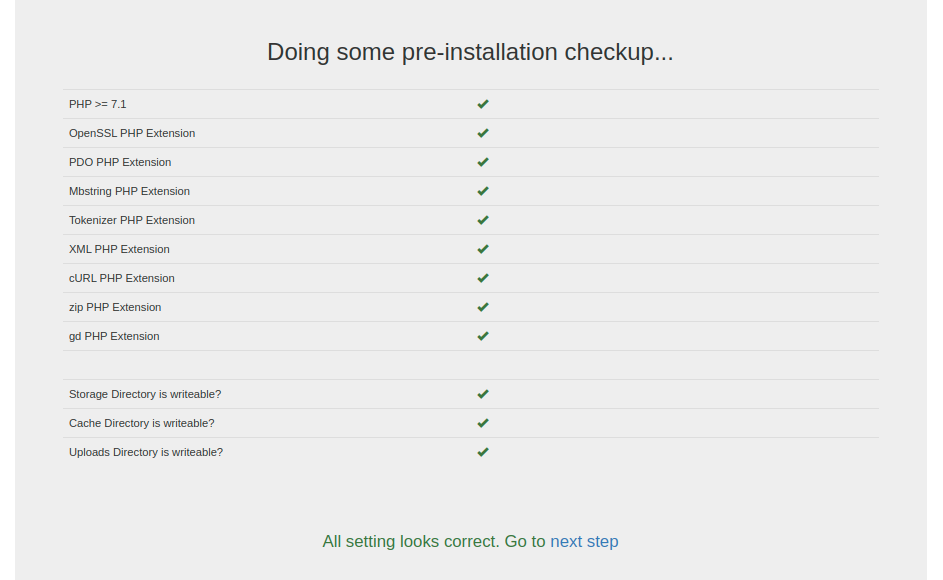
Here you will see a screen with “Doing some pre-installation checkup…” - 2.6 Make sure all checks are shows as Green-Tick. If there is something with Red-Cross then fix it and refresh the page to check again. After all Green-Tick click on “Go to Next Step”
- 2.7 Follow the installation instructions as displayed in the screen.
- 2.8 After all installation is done, Go inside public folder and delete the install folder present.
Installing in Livehost:
- In case you want to install the system in hosting, here are the steps:
- 3.0 Make sure the URL of application is like www.yourwebsite.com or any-subdomain.yourwebsite.com for better experience. Installing in folders like www.yourwebsite.com/any-folder-name/pos is not recommended.
- 3.1 Upload the extracted POS zip file (all files & folders inside UltimatePOS-CodeBase-V2.8.1) in the server document root.
- To upload the file you can use FTP client like filezilla (https://filezilla-project.org/)
- Or you can upload it directly by logging into your cPanel (or direct admin) & going to file manager.
- 3.3 Open your website http://your-pos-website.com/install or http://your-pos-website.com/public/install
- 3.4 Make sure all shows a Green-Tick. If there is something with Red-Cross then fix it and refresh the page to check again. After all Green-Tick click on “Go to Next Step”
- 3.5 Follow the installation instructions as displayed in screen.
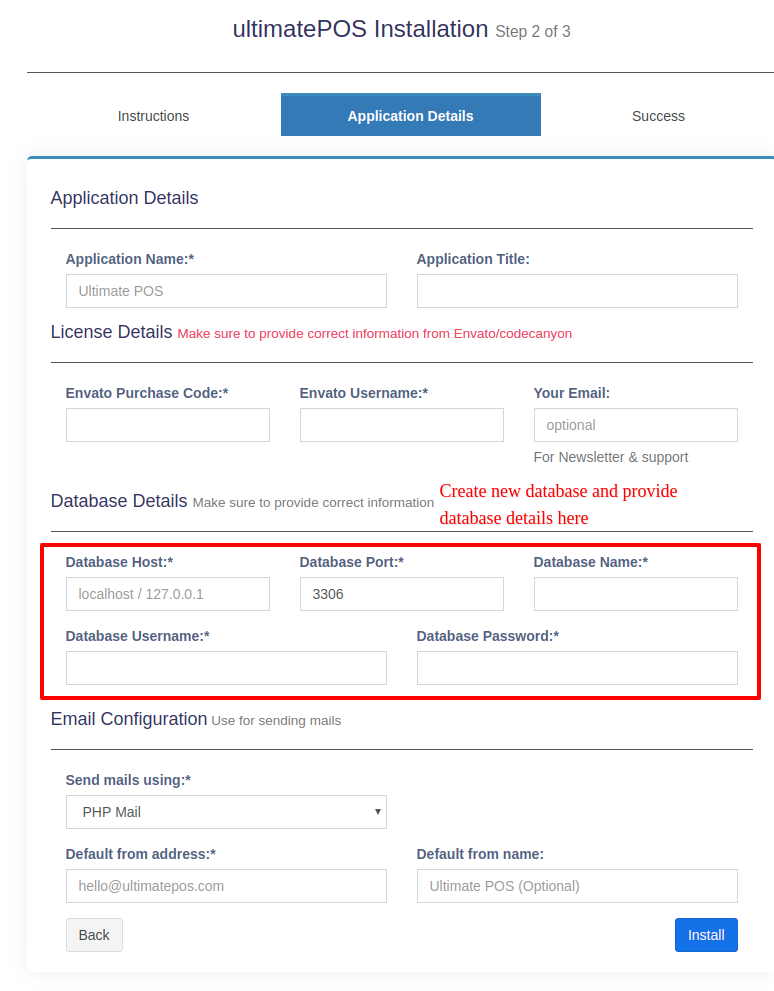
- 3.6 You will see the installation page as given below or if shows some error then check debugging errors notes given below.
- 3.7 After all installation is done, Go inside public folder and delete the install folder present.
- “Doing some pre-installation checkup.” Screen: Make sure all are marked with Green-Tick then click on “Next Step”

On clicking “Next Step” it will go to the Installation screen as shown below in step 5.
Not Found Error: If it shows a not found error after clicking on the “Next Step” link then try changing the link as below:
– www.yourwebsite.com/public/install-start
– www.yourwebsite.com/public/index.php/install-start
(to remove index.php from the URL make sure you have mod_rewrite enabled, contact your hosting for more details) - POS installation screen:

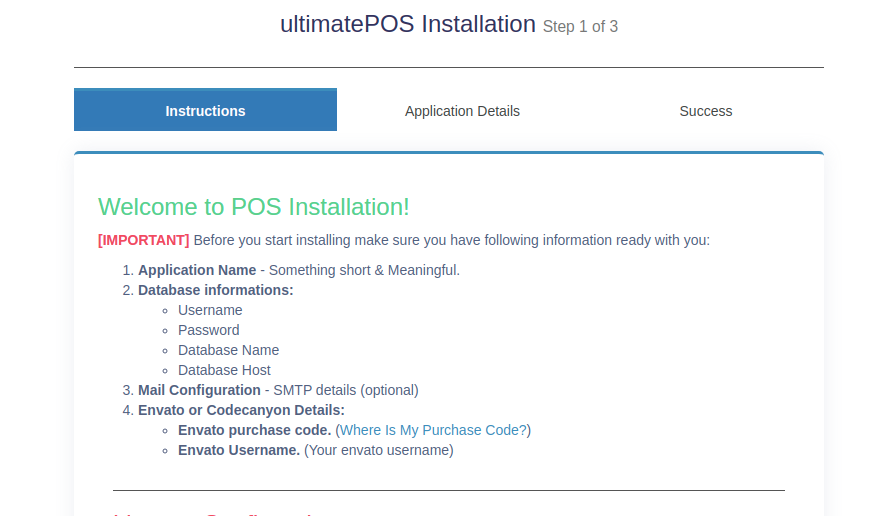
Read the instructions. it says to keep all your information ready for next step, like database details, email configuration, envato purchase code .
- Click on next “Let’s Go”. It will check your server. If all of them are green then you’re ready for next step, else install the PHP library missing. After everything looks correct it will show a green sign.
 “You must type a file name” Error in windows: Check the steps mentioned at the end with heading – (creating a hidden file in windows)
 - Click on “Install” after this and wait for a few minutes to process (1 to 10 minutes depends on hosting)
- It will display an install success screen.
Debugging Errors:
While installing there can be some errors because of a few reasons, check the below & fix them accordingly.
Syntax Error:
If it shows a syntax error then make sure the PHP version as mentioned in the top Server requirements
500 Internal Server error
This can happen if the server is not configured properly. Check your server Log and fix it accordingly.
-
- If it shows SoftException in Application.cpp:651: Directory “/installed-directory/public” is writeable by group, referer: http://your-pos-website.com, then go to the public folder and make its permission as 755
- If it shows SoftException in Application.cpp:651: Directory “/installed-directory/public/index.php” is writeable by group, referer: http://your-pos-website.com, then go to the public/index.php folder and make its permission as 755
Image not showing:
Check this document to fix the image issue: https://ultimatefosters.com/ultimate-pos/ultimatepos-faqs/#Logo_or_Image_not_Getting_displayed
mysqli_connect error:
Undefined function App\Http\Controllers\Install\mysqli_connect(). If you get any error related to mysqli_connect, check these two things
- Check whether all the database details provided during the installation are correct.
- Make sure to enable mysql PHP extension in your server. Contact hosting to if unable to determine it.
There is no active transaction
If it shows this error on updating simply ignore it. The update is successfully done.
Note:
- You can create as many businesses as you want with this.
- After successful installation, if you visit .com/install, you will get an error page. If you want to change any further details like the database, database name, host, database password; you can do it by changing in .env file present inside codebase.
Removing public from url
Sometimes after installation you will see public in url like www.example.com/public/login, to remove it follow this steps:
- Make sure mod_rewrite is enabled on your server. Contact hosting to know if enabled or not. If mod_rewrite is enabled then try accessing without public, it should work.
- If step 1 is working, then proceed with this steps. Open .env file present in codebase, check the APP_URL and remove public from url.
In windows when you try to create .env file – “You must type a file name” error is thrown.
In File Explorer, call your file .env. and it will remove the ending ‘.’
.env.example file missing error
- All files are included in the zip file which you download
- If you’re copying files/folders from another directly make sure to enable “show hidden files” or “Show dotfiles” in your Operating System or server.
- The best way is to download the file again and extract it.
Error: Looks like you haven’t created the .env file
This error indicated that you’ve not created the .env file mentioned in during installation, so please create it.
STEPS TO BE FOLLOWED AFTER INSTALLATION
Once you are done with your installation, click on the register button on the home screen of UltimatePOS.
It will take you to the registration page, where you have to enter your business details like your business name, address, currency, and so on.
NOTE: If you couldn’t find your currency in the dropdown list, then you can add it. Follow the steps in this documentation link below to achieve it.
After entering all your details, click NEXT and enter the details for business settings which includes the tax details and stock accounting method used by your business. You can also add the tax details inside settings after registration.
Again if you click NEXT it asks for owner details. Enter the required details and click register. It will direct you to the login page. The username and password given by you during this registration are your login credentials.
License Options for UltimatePOS:
There are two licensing options available for the main UltimatePOS software
- Regular: With the regular license on purchase the UltimatePOS can be installed and used in one domain (1 domain for production & 1 domain for testing purposes).
- Extended: With the extended license on purchase, the UltimatePOS can be installed and used in 13 domains.
License Option for modules – https://ultimatefosters.com/docs/ultimatepos/addons/module-licensing/
Installation already done:
If you want to overcome this message:
Delete the .env file present in pos document root and then it will work.
📩 Still stuck? Contact Support


