
What is SaaS or Superadmin Module?
- SaaS is Software as a service. (https://en.wikipedia.org/wiki/Software_as_a_service)
- With this module, you can sell UltimatePOS Advance as a subscription package to users.
- You can see all the businesses registered in the POS, Add a New business, Deactivate a business, or delete them completely.
How is this SaaS module different from UltimatePOS advance
Some users asked us this question, so we thought of mentioning it here 😀
- UltimatePOS advance is the main POS software, which is required if you need POS
- SaaS/Superadmin Module is an Optional extension to it. With SaaS/Superadmin module you can sell subscription packages to businesses. It is can help you be Profitable/ Monetize your💰💰💰 POS application.
Features in SaaS & Superadmin module:
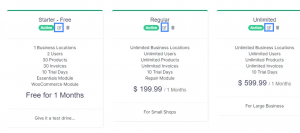
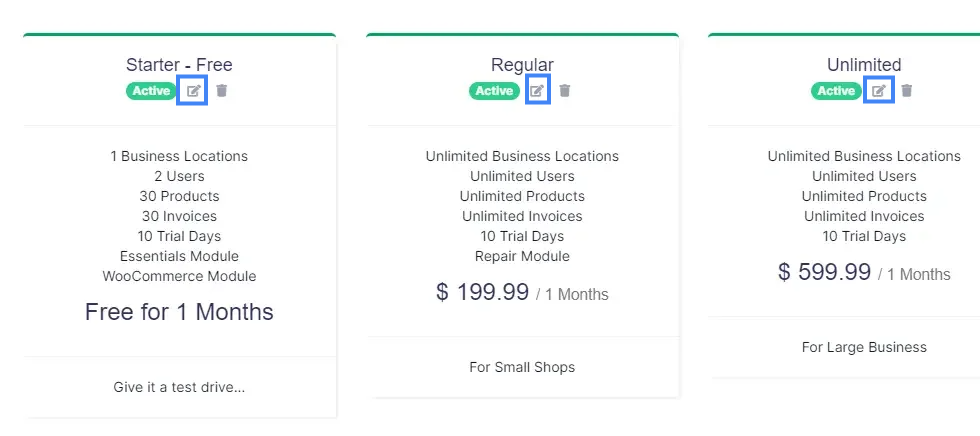
Packages:
- Create Unlimited subscription packages
- Activate, Deactivate or Delete Packages
- Trial Days
- Free Packages
- Daily / Monthly / Yearly Interval selection
- Limit number of locations, active users, Products, Invoices,
- Superadmin only use packages (Private packages for superadmin)
- One-time use package only (Use Case: Free package can be enabled to use once only).
- Force active new packages: While activating new packages, the currently running package will be stopped automatically.
- Mark Package as Popular: Most used packages can be marked as popular in the edit package screen.
- Assigning business locations: Business locations can be assigned to a package. Only these locations can use the package.
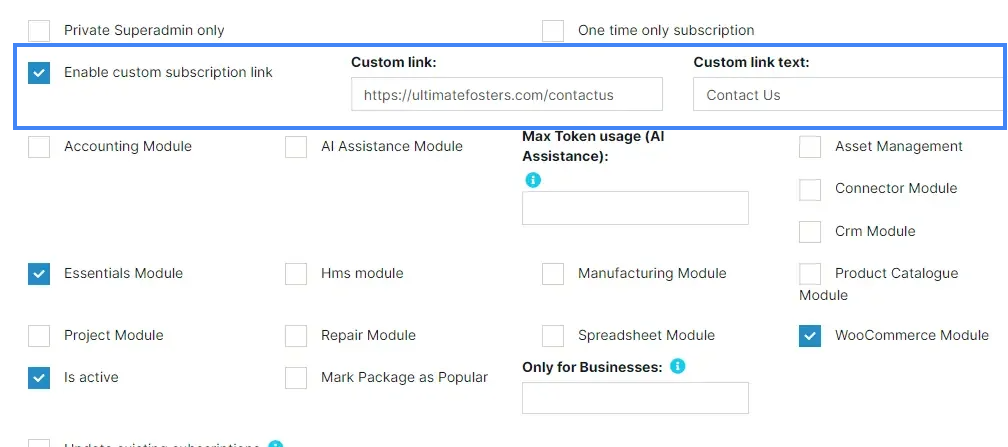
- Custom URL in package subscriptions: Custom URL for packages are external URLs. Using this link customers can contact you for a customized package for them. For example, something like “Contact Us” page for a Higher Enterprise package.
Manage Businesses:
- Add, View, Deactivate or delete businesses.
- View business subscription logs
Payment Gateways:
- Stripe
- Paypal
- Offline payment
Subscriptions
- Subscriptions expiry notification.
- Superadmin can edit business subscription start/trial/end date
- Subscription invoice with print option
- Allocate subscriptions to businesses directly from superadmin
Settings:
- Company-based Username.
- SMTP/Email setting
- Backup setting
- Payment Gateway Settings
- App default settings
- Communicator module to send email to all/selected businesses owners
- Intuitive dashboard to give details of your businesses.
- One-Click installation
- Complete setup guide.
- Company-based Username.
- Subscription/Pricing landing page (hidden in demo)
- Compatibe with WooCommerce addon.
Login as a customer:
Using a super admin login, the admin can log in as a customer. this feature is available in version 4.7.8 and above.
To enable this feature, Go to Superadmin > All Business > Action > Manage > Scroll down to Users list > Click on “Login as ” button
More updates coming soon…
For premium, support contact us here: http://ultimatefosters.com/support/
Installing the SaaS/Superadmin Module
Installing the Superadmin module to UltimatePOS is easy as cake. Make sure you meet the below requirements:
- Since this is not a standalone application you will need UltimatePOS (Download from here)
- UltimatePOS – Advance Version 2.7 or higher installed. For UltimatePOS installation step refer to this documentation.
Installing:
Setup:
- Superadmin Settings: Go to superadmin setting and add the relevant details.
- Packages: Go to packages and new packages. You can also edit/delete/deactivate packages.
- Payment Gateway: Setup payment gateways as below.
Creating Packages:
- Go to superadmin – Packages for adding new packages.
- Add Name, Descriptions, and other details.
- If you need to assign infinite Users, Locations, Invoices, Products just make the number as 0.
- If you want to create a Free package make the price 0.
- Trial period is the period in which you can issue a refund to the customer if the customer is not satisfied. The refund must be done manually from your side.
- Private Superadmin only: If the package can only be seen by superadmin then select this. This package will not be shown to other user roles.
- One-time-only subscription: Select this option if the package can only be used one time by a business. For example: Free package can only be used once, businesses will not be able to subscribe it more than once.
- Enable custom subscription link: Used when you want to give a custom URL to package subscription button, for example: for Higher-Enterprise package you can give a contact us link in the package subscription so that they contact you for an enterprise package.
Using Packages:
- After the user subscribes to a package from Settings -> Package Subscription, it will appear on the super-admin panel in the package subscription screen.
- Now if the super admin sets the package subscription’s status as “Approved” it will be set as a running package.
Updating Packages:
- You can edit any package to update them.
- If you want the package update to be applied to all existing businesses who have already subscribed, then you have to select “Update existing subscriptions” checkbox in the edit screen.
NOTE: update will be applied only to the subscription which has not expired.
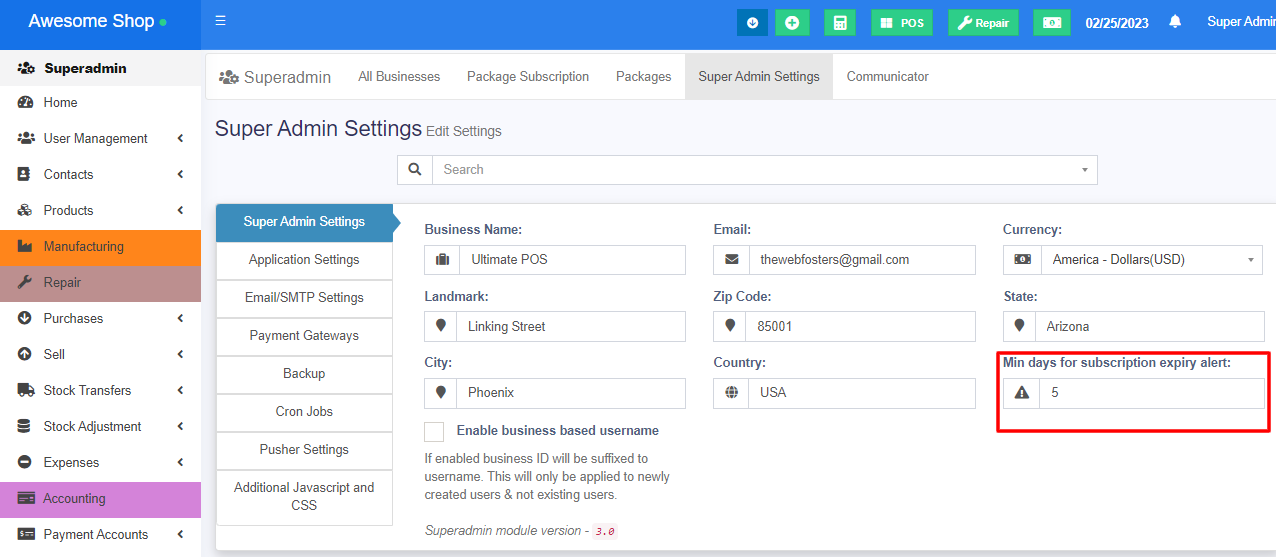
Expiry Notification for Packages:
- Expiry notification for pacakges can be sent to clients.
- The minimum number of days before the expiry date should be mentioned in the field provided in the superadmin settings.
Force Active New Packages:
When a package, for example, ‘starter‘ is running currency and the user has to switch to a new package, this feature will be useful.
To activate a new package when the current package is still running, follow the simple step
Step 1: Subscribe a package from the available list in the Settings > Package Subscription screen.
Step 2: Once subscribed, press the force activate button, to activate it as the current package to use it.

Payment Gateway:
Offline:
Offline gateway can be enable/disable from Superadmin -> Superadmin Settings -> Payment Gateway -> Enable Offline Payment
Stripe:
Stripe is configured out-of-box with UltimatePOS.
- Login to you stripe account. Go to API
- There you will find stripe public key and private key. You can also click on “Test” mode.
- Go to Superadmin -> Superadmin Settings
- Add the “Stripe Pub Key:” & “Stripe Secret Key:”
- And stripe is ready to use.
- NOTE: If you’re using stripe in Demo Mode, make sure to enable “Live” mode and provide the live keys. More details here: https://stripe.com/docs/keys.
- If you want you can customize the view file code for stripe. The file path for the view file is given below.
pos\Modules\Superadmin\Resources\views\subscription\partials\pay_stripe.blade.php
Paypal:
PayPal is configured out-of-box with UltimatePOS.
- Obtain your API Username, API Password & API Signature/Secret.
- To obtain this refer to this official documentation on API Signatures
- Use “NVP/SOAP API integration (Classic)“
- Go to Superadmin -> Superadmin Settings
- Select the Paypal Mode (Live or Sandbox)
- Enter the API details in live or sandbox: “API Username”, “API Password”, “API Secret” (API secret is same as API signature)
- NOTE: to accept payment from customers you must make the mode to live and provide the like “Live API Username”, “Live API Password”, “Live API Secret”. Sandbox is for testing purposes only.
- ERROR: If you get an error in during the payment using paypal, kindly follow the steps mentioned below.
- Login on `https://www.paypal.com`
- Visit `https://www.paypal.com/businessmanage/credentials/apiAccess`
- Click on Manage API credentials under the section Custom checkout experience > NVP/SOAP API integration (Classic). Refer to this screenshot – https://prnt.sc/unoHpy9gGLHY
- Choose `Request API signature` & click Agree and Submit. Refer to this screenshot – https://prnt.sc/CCZx5pnzpORp
- Copy the api username, password & signature & use it as paypal credentials (api username, api password, api secret respectively). Refer to this screenshot – https://prnt.sc/ILTX3BWkuU_O
Razorpay:
Razorpay payment gateway is used in India.
NOTE: To use this payment gateway first make sure in the Superadmin settings you have set Currency to INR, if some other currency is used then it will throw some error in the payment screen.
Steps for setting it:
- Register an account in razorpay.com
- Go to Settings -> API keys in razorpay website. And click on “Create key“. Copy the generated key.
- Put the key id and key secret details in POS superadmin Payment gateway settings.
- On the razorpay website itself, you can select the Test mode or Live Mode.
Pesapal:
Pesapal is mostly used in Kenya and nearby countries.
NOTE: To use Pesapal payment gateway first make sure in the Superadmin settings you have set Currency to KES, if some other currency that is not supported by pesapal is used then it will throw some error in payment screen.
Steps for setting it:
- Register an account in pesapal.com
- Get the API details by clicking on “Resend Code” button present in pesapal dashboard. On clicking this button you will receive the Customer key & secret in your registered email.
- Go to POS Superadmin Settings -> Payment Gateways, enter the pesapal Consumer Key, Consumer Secret & Is Live as true.
- Now go to Webhook in pesapal and add the below:
- Website link: www.yourwebsite.com
- Webhook: www.yourwebsite.com/pesapal-ipn
Note: Since this uses webhook testing in localhost may not work, you have to test it in the hosting server.
Pesapal not working shows 500 error:
- Make sure you’ve provided all the details correct as mentioned above.
- Apply this pesapal patch
Flutter Wave:
- visit: https://dashboard.flutterwave.com/login
- Go to Settings menu > API tab
- generate API keys
- Add these keys in Superadmin settings -> Payment gateway -> Flutterwave
Paystack:
- Visit: https://dashboard.paystack.com/#/login
- In paystack: Go to Settings menu > API Keys & Webhooks tab
- In paystack: generate keys and save changes
- In paystack: Web hooks enter the Callback URL. The callback URL will beHTTP(s)://yourwebsite.com/subscription/post-payment-pay-stack-callback
- Go to Settings menu > Preferences tab, select the type of payments you want to accept, and make other preferences
- Get the keys and add them in UltimatePOS superadmin settings -> Payment gateway -> Paystack.
Offline:
- For offline payment, the application sends a notification email to Superadmin so that they can approve it. So it needs a valid email setup (or SMTP setup), else it will throw an email error.
- Emai/SMTP setup is done during the UltimatePOS installation process. But if you haven’t configured it properly there then you can follow the details as described here.
Email/Smtp setting
Email/Smtp setting
- Go to Superadmin -> Superadmin Setting -> Email/SMTP setting
- Select mail drive as SMTP.
- Add all SMTP details.
Enable new business registration email: Email will be sent to superadmin on new business registration.
Enable new subscription email: Email will be sent to superadmin on any business new subscription.
Allow other businesses to system SMTP
- With this option other businesses will not have to configure the SMTP details, instead, they can use the system or superadmin SMTP.
- Enable – Allow businesses to use Superadmin email configuration
- Save it.
- Now in any business go to Settings -> Business Setting -> Email setting, and here you’ll find an option to use the system SMTP, enable it and save.
Updating to new Version
Before updating make sure you have the latest version of UltimatePOS.
Also, take/download a Backup using our Backup feature.
Follow the instruction given in this link.
Business-Based Username:
With a business-based username, every username for a business will be suffixed with an internally generated business id. This will allow different companies to use the same username.
To enable it to go to Superadmin -> Superadmin Settings & check the ” Enable business based username” checkbox and click on the Update button.
This will activate this feature.
Note: This will not change existing usernames. All new usernames created will have this effect.
Now when a new user is added from Users – Add User, it will display a modified username below the username field. This username should be used for login by this user.
Manage User:
To manage user using SaaS module, Go to Superadmin -> All Business -> Manage.

Here you can change the password of each user.
Deactivate or delete business:
You can also deactivate or delete a business from the SaaS module.
Go to Superadmin-> All Business -> Deactivate/ Delete.

Deleting a business will delete all its related transactions.
Editing existing subscription: Star-End date & Status:
If you want to change the subscription status of a business or change the start-end date of a business follow this step:
- Go to Superadmin > Package Subscription menu
- Here you’ll see a list of package subscriptions by all businesses.
- Click on Edit button to change the Start-End & Trial end date
- Click on Status to change the status to Approved, Waiting, Declined & edit transaction id.
Coupon Code for Packages:
Coupons can be provided for customers for package payments.
Adding Coupons Code:
To add a coupon code, follow the steps below
Step 1: Go to Superadmin > Coupon Tab. Click the add button to add a new coupon.
Step 2: Provide the details as explained below
Coupon Code: Provide a unique code for each
Discount Type: Discount type can be fixed or percentage
Expiry Date: The coupon code will be valid until this date
Step 3: Apply conditions
The coupon can be applied to specific packages and business locations.
Using Coupons Code:
Step 1: Access Package Subscription
- Navigate to the “Settings” section.
- Click on “Package Subscription.”
Step 2: Initiate Package Payment
- Within the Package Subscription section, locate and select the package you want to subscribe to.
- Click the “Pay” button to begin the payment process.
Step 3: Apply Coupon Code
- On the payment page, you’ll find an option to add a coupon code.
- Click on the designated field to enter your unique coupon code.
Step 4: Apply Discount
- Once you’ve entered the coupon code, the system will automatically apply the associated discount amount.
Step 5: Complete Payment
- Review the payment details to ensure the discount has been applied accurately.
- Proceed to complete the payment process by following the provided instructions.
Other modules not showing to other users except Superadmin:
If you’re already using other modules (for example CRM or Essentials or Other) before using SaaS-Superadmin then after installing SaaS modules, those modules will not be shown to other users.
Steps to follow:
- Other modules will not be shown to any other users because after installing SaaS module, all businesses need a subscription.
- So Login with superadmin & create a package or edit a package
- In the add/edit package “check” the modules and check the “update existing subscription”
- Save the package
- All users subscribed to the package will now have access to all modules you added in this package.
Adding Custom URL on Packages:
Custom URLs for packages are external URLs with which you can redirect the customers to any desired page. For example, the “Contact Us” page of your website. So when users click it, it will direct them to the respective page(eg, URL of your website contact page).
- NOTE: The URL must be an active URL (eg, URL of your website’s contact page ).
To add custom URL on packages, follow the steps mentioned below
- Step 1: Go to Superadmin > Packages.
- Step 2: Click the Edit Option of the required package.
- Step 3: In the edit page, enable the ‘enable custom subscription link’ checkbox.
- Step 4: Add an active URL in the Custom Link Field. This URL must be active. eg: “Contact Us” page of your website.
- Step 5: Also, add relevant text to the Custom link text. This URL text will be displayed on the pay button of the package for the users.
NOTE: If you add a custom link for the packages when a customer selects this package, it will redirect to the link. Else it will redirect to the payment page.
Adding Google Analytics Link:
What is Google Analytics – Wikipedia
In order to add a Google Analytics link, you can use the ‘Additional JS‘ option present in the SAAS module.
Go to Superadmin > Superadmin Settings > Additional JS. Here you can add the JS code for Google Analytics.
The Google Analytics link will be added to all pages of the website.
FAQ:
How to deactivate the currency running package and activate a new package?
In order to force activate a new package, you can use the “Force Activate” button.
You will find the button in Business Settings > Package Subscriptions. When users subscribe to a package they can use this force activate feature.
🎥Video Demo
Version Log:
V 6.4 – Released November 21, 2025
- NEW: Added AI functionality to the Superadmin Communicator.
V 6.3 – Released April 9, 2025
- Fix: Coupon activate/deactivate issue
V 6.2 – Released Feb 18, 2025
- FIX: Superadmin dashboard graphs to only show approved payment/subscriptions
V 6.1 – Released Feb 6, 2025
- FIX: Pricing page currency formatting issue
- FIX: Pricing card overlap issue in mobile screen
- Missing Translation added.
V 6.0 – Released June 7, 2024
- NEW: Updated as per new design.
NOTE: You must update UltimatePOS to V6.x before updating the module to this version.
V5.1 – Released August 23, 2023 (minor release)
- Fix: Edit coupon code issue fixed.
V5.0 – Released August 23, 2023
Important: If you’re using Paypal payment method then after updating to 5.0 you’ll have to make some changes in the payment gateway. Changes instructions are in the payment gateway setting screen.
- NEW: Coupon Code option added for packages – Document Link
- NEW: Added an option to mark the package as popular – Document Link
- NEW: Particular business can be added to a package – Document Link
- NEW: Force active new package subscriptions –Document Link
- NEW: Improvements in PayPal payment method.
- FIX: The issue in Superadmin Subscription Expiry Notification is fixed.
- FIX: The issue in Superadmin install/update is fixed.
V4.0 Mar 2, 2023
- NEW: Compatible with V5.0 pos
- NEW: Added search filters for package subscription
- NEW: Added date of creation for packages
V3.0 July 13, 2022
- NEW: Ability to log in as any other user from superadmin
V2.9 Feb 2, 2022
- Minor bug fixes & Improvements
V2.8 August 19, 2021
- Subscription date issue fixed.
- Minor improvements & fixes.
V2.7 March 04, 2021
- Divide by zero issues fixed
- Miscellaneous fixes & improvement
V2.6 Dec 21, 2020
- NEW: List business is converted to data table.
- Filters added in list business.
V2.5 Sep 9, 2020
- FIX: Subscription date fixes
- FIX: PayStack & Flutterwave issue fixes
V2.4 Aug 25, 2020
- NEW: Paystack payment gateway
- NEW: Flutterwave payment gateway
- New improved design for menu
V2.3, July 15, 2020
- FIX: Offline payment fix
- Miscellaneous System improvements & fixes.
V2.2, May 20, 2020
- [NEW]: offline payment details instruction to show to the subscriber.
- [NEW]: User without login not counted as in user limit count.
V2.1, March 26, 2020
- [Improvement]: Superadmin settings Additional Javascript & CSS has to be written with script/style tags.
- [Improvement]: Changed Terms & conditions from textarea to editor.
- [Improvement]: Added option to Enable/Disable Offline payment method. Can be done from Superadmin Settings -> Payment Gateways -> Offline
New release – V2.0 February 27, 2020
- Compatible with UltimatePOS 3.0
- Many fixes & improvements
New release- V1.6, November 18, 2019
- Razorpay (Indian payment gateway) integration
- Pesapal (Kenya payment gateway) integration
New release- V1.5, October 2, 2019
- Fixed Paypal issue
New release- V1.4, September 12, 2019
- Update existing subscriptions option improvement in Edit package
- Date fixes
- Fixes & Improvement
New release- V1.3, May 30, 2019
Note: Version 1.1 & 1.2 skipped for internal purposes.
- Allow other businesses to send Notification Email from System SMTP
- Minor improvements & fixes.
New release- V1.0, 12th December
- NEW: Enable/Disable Terms & Conditions in New business registration.
- IMPROVEMENTS: Owner Mobile number, First location contact number displayed in all business
- Other improvements & Fixes
New release- V0.8, 12th November
- NOTE: Before updating make sure you have the latest V2.11 of UltimatePOS
- NEW: Superadmin only use packages
- NEW: Custom URL in package subscriptions
- NEW: One-time use package only
- Compatibility release with WooCommerce addon.
V0.7.1 – October 2018
- Some Fixes
V0.7 – 12 September 2018 [Mega Release]
- NEW: Company based Username
- NEW: Allocate subscriptions to businesses directly from superadmin
- NEW: Communicator module to send email to all/selected businesses owners
- NEW: Subscription/Pricing landing page (hidden in demo)
- NEW: Improved settings: SMTP/Email setting, Backup setting, Payment Gateway Settings, App default settings
V0.6 – 22 August 2018
- Subscription expiry notification email with customizable duration
- Subscription invoice added with print option
- Superadmin can edit business subscription start/trial/end date
- Offline payments fixes
V0.5
- Initial Release