
Custom Dashboard Module
The Custom Dashboard Module allows you to create personalized dashboards tailored to different roles, business locations, and operational requirements. Instead of using a fixed dashboard layout, you can build dashboards that display the most relevant information for each user as soon as they log in.
Whether you’re managing sales teams, store managers, accountants, warehouse staff, or business owners, Custom Dashboards help transform business data into actionable insights.
Installing the Custom Dashboard Module:
Before installing the dashboard module, make sure you’ve installed the latest version of UltimatePOS.
To install this module, follow the steps for installing a module as mentioned in this documentation Documentation Link
Creating a Dashboard
Create a dashboard by adding the widgets required for your business.
Steps
- Go to Custom Dashboard from the sidebar.
- Navigate to Manage Dashboard.
- Click Create Dashboard.
- Select and configure the required widgets, such as:
- Top Selling Products
- Total Sale Due
- Sales Reports
- Purchase Reports
- Stock Reports
- And other available widgets
- Configure the widget settings based on your requirements. Depending on the widget, you can configure options such as:
- Widget Size
- Date Range
- Business Location
- Auto Refresh
- Other widget-specific settings
- Click Add to include the widget in the dashboard.
- Repeat the process until all required widgets have been added.
- Enter a Dashboard Name.
- Click Save.
The dashboard will be listed under Manage Dashboard, where it can be viewed, edited, cloned, or deleted.
Cloning a Dashboard
The Clone Dashboard feature creates an exact copy of an existing dashboard, including all its widgets and configurations.
This is useful when you want to create a similar dashboard without rebuilding it from scratch.
Steps
- Go to Custom Dashboard → Manage Dashboard.
- Locate the dashboard you want to copy.
- Click the Clone button.
- A confirmation dialog will appear.
- Click OK.
A duplicate dashboard will be created, which can be edited independently without affecting the original dashboard.
Displaying Data Based on User
Certain widgets allow you to control whether the displayed data should include all users or only the logged-in user.
While creating or editing a widget, choose one of the following options:
- Show All User Data – Displays data for all users.
- Show Logged-in User Data – Displays data only for the currently logged-in user.
Note: This option is currently available only for the Cash Register Report widget.
Using Dashboard Templates
The module includes several pre-built dashboard templates for quick dashboard creation.
Steps
- Go to Custom Dashboard → Templates.
- Browse the available templates.
- Click Preview to view the dashboard layout before using it.
- Select the desired template to create a dashboard based on it.
Using templates significantly reduces the time required to create dashboards.
Assigning Dashboards to User Roles
You can control which dashboards are available for each user role.
Steps
- Go to Custom Dashboard → Settings.
- Select the required User Role.
- Choose one or more dashboards to assign to that role.
- Save the settings.
Example:
If you assign Dashboard 1 and Dashboard 2 to the Cashier role, users with the Cashier role will only be able to access those dashboards.
Setting a Default Dashboard for a User
You can assign a default dashboard that opens automatically when a specific user accesses the Custom Dashboard module.
Steps
- Go to Custom Dashboard → Settings.
- Select the required user.
- Choose the Default Dashboard.
- Save the settings.
The selected dashboard will automatically open whenever that user accesses the Custom Dashboard module.
Auto Refresh Data
Widgets can be configured to refresh automatically, ensuring that dashboard data remains up to date without requiring manual page refreshes.
How to Configure
- While creating or editing a widget, locate the Auto Refresh option.
- Select the desired refresh interval from the dropdown.
- Save the widget.
The widget will automatically refresh at the selected interval and display the latest available data.
Creating a Dashboard Using AI Prompts
The AI Dashboard Generator allows you to create custom dashboards using natural language prompts, eliminating the need to manually add and configure widgets.
Prerequisite: The AI Module must be installed and activated in your UltimatePOS application.
Steps
- Go to Custom Dashboard → Manage Dashboard.
- Click the Use AI button.
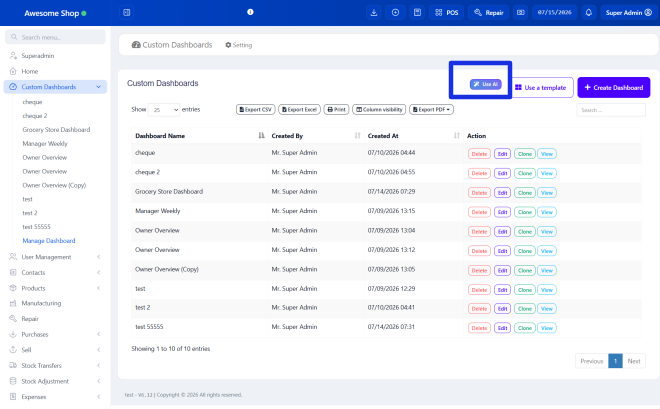
- Enter a descriptive prompt for the dashboard you want to create.
- You can refer to the sample prompts displayed on the right side of the screen for guidance.
- Click Generate Dashboard.
- The system will automatically generate a dashboard based on your prompt.
- Review the generated dashboard and make any necessary changes.
- Add, remove, or modify widgets as required, then save the dashboard.
Example Prompts
- Create a dashboard for a store manager showing today’s sales, top-selling products, stock alerts, and recent transactions.
- Create an accountant dashboard with total sales, total purchases, expenses, due payments, and profit & loss.
- Create a warehouse dashboard showing stock alerts, purchase orders, stock transfers, and recent purchases.
Tip: The more specific your prompt, the more relevant and accurate the generated dashboard will be. For best results, include the reports, widgets, date ranges, or business locations you want to display.
Video Demo:
Version Log:
Released V1.0, June 22, 2026
- Initial Release
Still stuck? Contact Support