
Adding Products
To add a new product to the system, follow the steps below:
Step 1: Navigate to Add Product
Go to Products → Add Products.
Step 2: Enter Product Details
Fill in the following fields:
Product Name: Enter the name of the product.
Brand: Select the brand if applicable.
Units: Choose the appropriate unit (e.g., pcs, kg, litres).
Category: Select the main category for the product.
Sub-category: (Optional) Choose a sub-category if applicable.
Step 3: Set SKU (Stock Keeping Unit)
SKU is a unique identifier used for barcodes and product tracking.
You can enter a custom SKU or leave it empty to auto-generate one.
Optionally, add a Prefix to the auto-generated SKU for easy identification.
Step 4: Select Barcode Type
Choose a Barcode Type. The default and recommended option is C128. (Change the barcode type only if your product already has an existing SKU/barcode format.)
Step 5: Not For Selling (Optional)
Enable Not For Selling if the product should not appear in the POS or Sales Screen. (This option is useful for ingredients in manufacturing or to temporarily disable a product from being sold).
Step 6: Set Alert Quantity
Define the Alert Quantity to get notifications when stock levels fall to or below this number.
Step 7: Manage Stock
Enable or disable Stock Management for the product.
NOTE:
🔸For services (e.g., Repairing, Haircutting, Web Development), stock management is not required.
🔸 When stock management is disabled, the product can be sold in unlimited quantities.
Step 8: Select Business Location(s)
Choose the Business Locations where this product will be available for sale or purchase.
Step 9: Set Applicable Tax
Select the Applicable Tax (e.g., GST, VAT) for this product.
NOTE:
🔸Make sure tax rates are configured in the system beforehand.
Step 10: Choose Product Type
Select the appropriate Product Type (e.g., Single, Variable, Combo) based on your inventory structure.
Now click on the save button to add the product.
Single Product:
The Single Product type is applicable for items that do not have any variations (e.g., size, color, weight).
Follow the steps for adding the product as mentioned above, then follow the steps given below
Step 1: Select Product Type
Choose Single as the Product Type.
Step 2: Enter Pricing Details
You will need to provide the following:
Default Product Price – This can be entered inclusive or exclusive of tax based on your business preference.
Profit Margin % – Enter the desired Profit Margin (e.g., 20%).
NOTE:
🔸You can set a default profit margin in Settings → Business Settings to avoid entering it every time.
Step 3: Auto Calculation of Selling Price
The system will automatically calculate the Selling Price (excluding tax) based on the profit margin and default cost price.
Step 4: Manual Price Adjustment (Optional)
You can also manually enter the Selling Price.
The system will then auto-adjust the profit margin based on the entered value.
NOTE:
🔸This flexibility ensures that pricing can be either profit-driven or fixed-price as needed.
Variable Product:
The Variable Product type is used for products that come with variations, such as size, color, design, flavor, etc.
Follow the steps for adding the product as mentioned above, then follow the steps given below for adding variable type
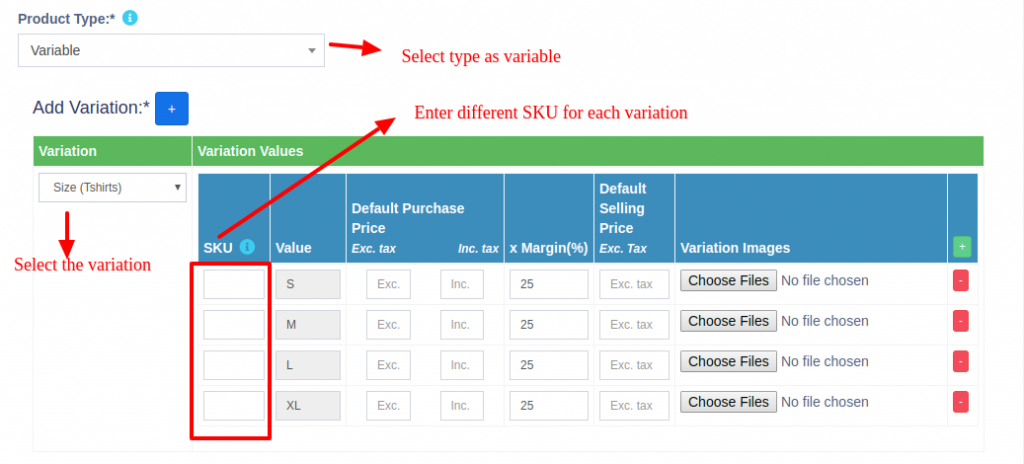
Step 1: Use for Products with Variations
Select Variable as the Product Type when a product has one or more attributes that vary.
Step 2: Define Variation Templates
Create and manage Variation Templates from Products → Variations.
NOTE:
🔸Templates save time by allowing you to reuse common sets of variations (like Small/Medium/Large or Red/Blue/Green).
Step 3: Add Product Variations
Once you select Variable Product, additional fields will appear for entering variation-specific details.
From the dropdown, choose the desired Variation.
The system will auto-populate the variations values based on the selected variation.

Step 4: Apply Purchase Price, Selling Price, or Profit Margin
- Enter the Purchase Price, Selling Price, and Profit Margin for each variation.
To apply the same Purchase Price, Selling Price, or Profit Margin across all variations, follow the steps below:
Click on the double tick icon located next to the first variation entry.
This will copy the entered values to all variations instantly.
For detailed steps on creating and managing variations, refer to the adding variations document.
Combo or Bundle Product
Combo Products, also known as Bundle Products, are used to combine multiple individual products into a single product. For example, a “Computer Set” can be created as a bundle that includes:
1 PC Monitor
1 PC CPU
1 PC Keyboard
1 PC Mouse
When a customer buys the Computer Set, they receive all of the above components as part of one product.
Stock Calculation for Combo products.
The available stock for a bundle depends on the lowest available quantity of any individual product in the combo.
Example:
PC Monitor: 5
PC CPU: 4
PC Keyboard: 10
PC Mouse: 50
Stock of Computer Set will be 4, based on the product with the lowest quantity (CPU).
Stock Management on Sale
When a Combo Product is sold, the stock of each individual product in the bundle is automatically deducted.
This ensures accurate inventory tracking for all bundled items.
Selling and Purchasing Rules for Combo products
Individual Products in the bundle can still be sold separately.
Combo Products cannot be purchased directly from suppliers. Only the individual products within them can be purchased.

Adding a bundle product
Adding a Combo or Bundle Product
Follow the steps for adding the product as mentioned above, then follow the steps given below
Step 1: Select Product Type
Choose Combo as the Product Type.
Step 2: Select Products for the combo
- Select the required products that are to be sold as a combo and add the required quantity for each product. Now save it
Adding Products with multiple variations:
If you have products with multiple variations (e.g., a shirt that has both color and size), there are a couple of effective ways to manage them in the system:
Solution 1: Create a Combined Variation
To create combined variation follow these steps
- Create a variation with a combined name such as “Color-Size”.
Add combined variation values like:
Red-Small
Red-Medium
Red-Large
Blue-Small, etc.
- While adding the product (e.g., Shirt), select this combined variation.
NOTE:
🔸This method is simple and works well when all combinations are fixed and known.
Solution 2: Create Multiple Products
To create multiple products follow these steps
- Create separate products for each main variation (e.g., Shirt-Red, Shirt-Green, Shirt-Blue).
- For each of these, add size as the second variation (e.g., Small, Medium, Large).
- Once you’ve added the first product (e.g., Shirt-Red with sizes), use the Duplicate Product action to create other color variants without re-entering all data.
NOTE:
🔸This method provides flexibility when dealing with larger sets of unique combinations and allows better inventory control.
Select Required variations:
When adding a Variable Product, you can choose only the required variation values. Follow the steps given below
- On the Add/Edit Product screen, select the Product Type as Variable.
- Select the Variation Name (e.g., Color or Size).
- A dropdown will appear, allowing you to pick specific variation values applicable to that product.

NOTE:
🔸This option is available only in POS version 5 and above.
Changing Default SKU length for Products:
To change the length of auto-generated SKUs follow the steps:
Open the file:
pos/app/Utils/ProductUtil.phpSearch for the function:
generateProductSkuModify the default value from 4 to your desired SKU length
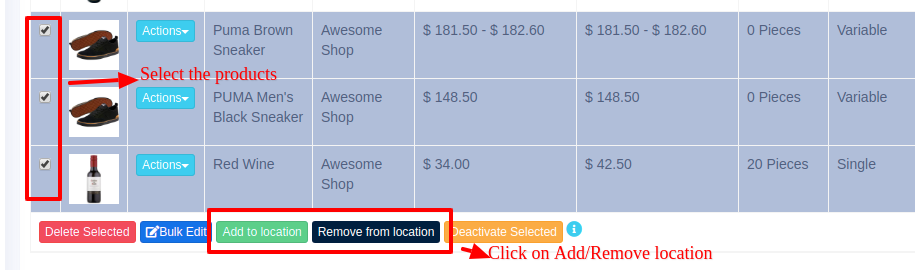
Assigning/remove locations of multiple products at once:
- Go to List Products and select the required products.
- You can find two button at the end of the list.
- To Add products to a location, click on Add to Location button and select the location.
- Similarly to remove products from a location, click in Remove from Location button and select location to be removed.
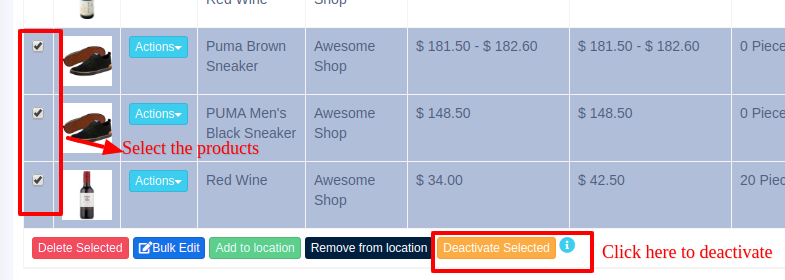
Deactivating & Activating Product:
- Go to List Products and select the required products.
- You can find a button at the end of the list.
- To Deactivate products, click on Deactivate Selected button to deactivate the selected products.
- To later Activate the deactivated products in step 3, click on Actions button of the product deactivated and click on Reactivate option.
Using Product barcode:
Question:
How can we use the product’s barcode instead of creating and printing new for every product?
How can we use the brand’s barcode of the product instead of creating and printing new for every product?
Answer:
When creating a product, in the SKU field enter the barcode number of the product. This barcode will be used to identify the product in all screens like POS, Sales, purchases, reports, and others.
How to add a product that already has a Barcode?
Adding products that already have a barcode, follow the same steps as adding any other products.
- Go to add products
- Fill in all the product details
- IMPORTANT: in the SKU field scan or enter the barcode of the product.
Adding product quantity or adding product stock
For systematically managing your business, product quantities can be added in 3 ways:
- Adding Opening stock
- Adding purchases
- Manufacturing product: Useful for manufacturers, required manufacturing module.
How to Add Products from One Business to Another or Bulk Import Existing Products into a Newly Installed System
To transfer products between businesses or import existing products in bulk into a new POS system, follow these steps:
- Use the Download Excel feature in the List Products section to export the product list.
- Open the downloaded file and ensure that all data is correctly formatted.
- Use the Import Products feature to upload the exported data into the POS system.
Note: When importing, make sure to copy and enter the data into each column provided in the downloaded Excel file according to the Import Product Template.
🎥 Video Demo
📩 Still stuck? Contact Support