
- Sale!

Table of Contents
Zatca Integration module for UltimatePOS
ZATCA Module for UltimatePOS:
The ZATCA integration module enables our POS software to generate and transmit e-invoices in compliance with Saudi Arabia’s e-invoicing regulations. It ensures invoices are synced and reported to the ZATCA portal in real time.
Installing the ZATCA Module:
Before installing the ZATCA module, ensure you’ve installed the latest version of UltimatePOS.
To install this module, follow the steps for installing a module as mentioned in this documentation Documentation Link
Integrating ZATCA with UltimatePOS
- Once ZATCA Module is installed, you can view it in the sidebar menu, click it.
- Go to the Onboarding tab.
- Here, for each business location, you need to provide the details related to ZATCA.
- Click on Submit button.
- Now, if you go to either the Sale or Sale Return tab, you can sync the transaction with ZATCA by clicking the sync button.
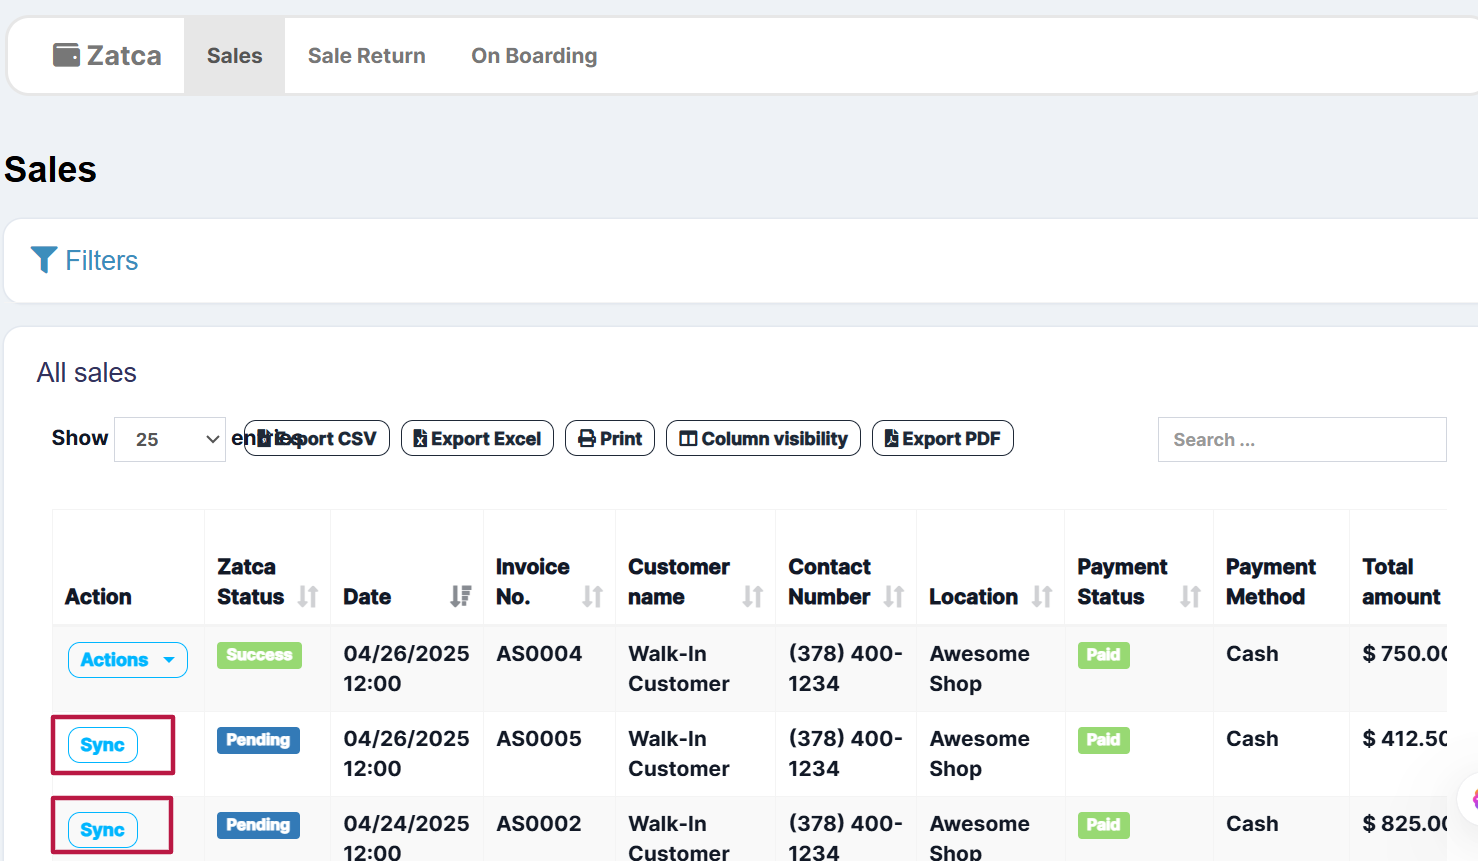
Auto Syncing Sale with ZATCA
There are three syncing options available in ZACTA Module
1. Instant(Auto Sync): Whenever a sale is created in UltimatePOS, it will be automatically synced with ZATCA.
NOTE: For auto-sync to work, a cron job must be added. Use the same cron command that is used for Backup.
Refer to the Cron Job Setup document for detailed instructions. (Document Link).
2. Daily: At the end of each day, the sales will be automatically synced with ZATCA.
3. Disable: Auto sync will not work in this case; you have to sync each sale manually.
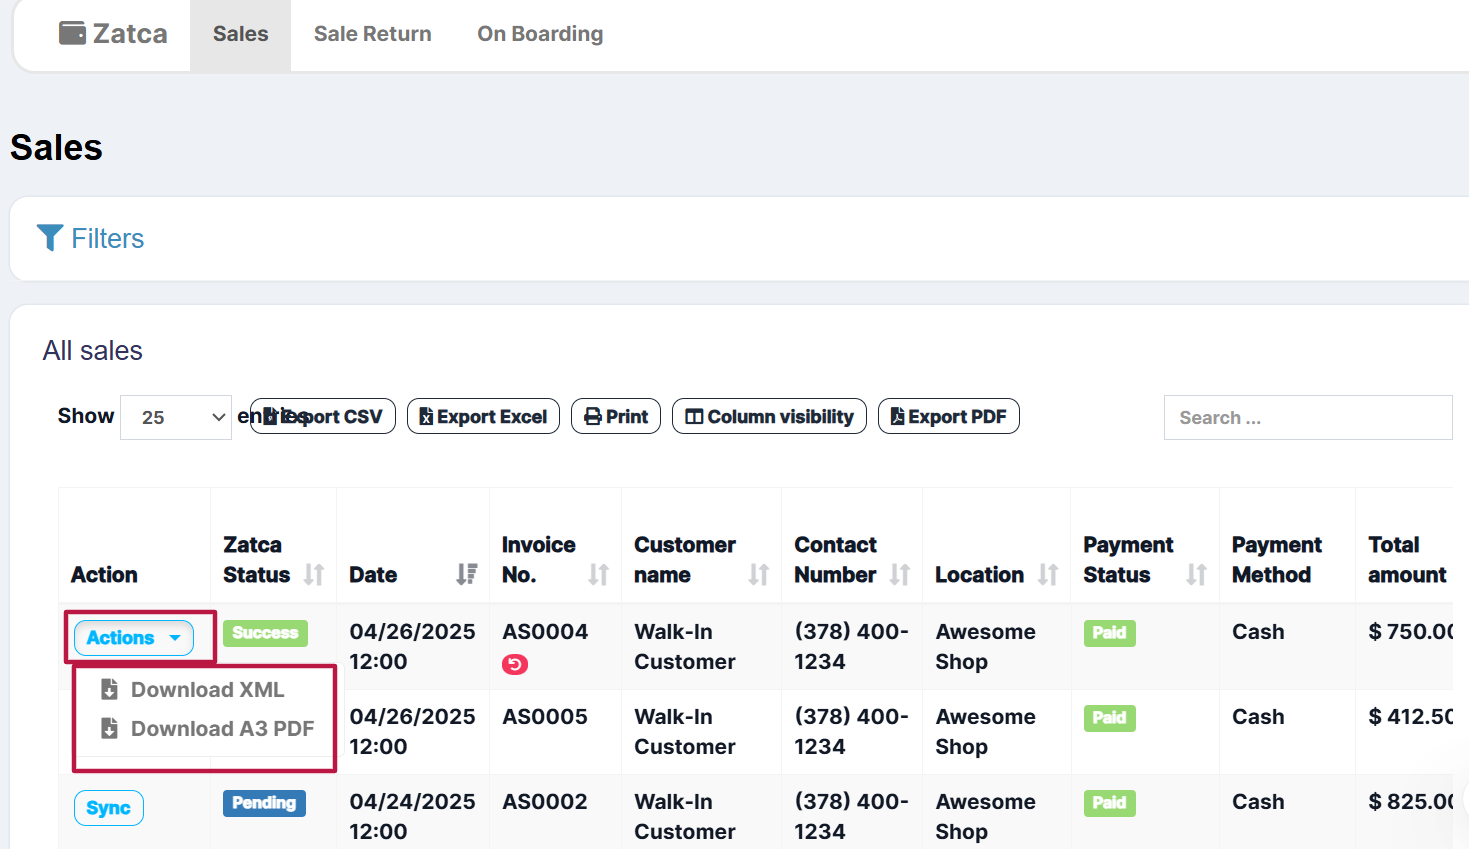
Downloading ZATCA Document
Once you have synced the transaction with ZATCA, you can download the document for reference or other usage.
To do this, follow the steps
- Go to Sales/ Sale Return tab.
- Click the actions button (Only the transactions that are already synced will have this option).
- A dropdown will be displayed where you can either download the document in XML or A3 PDF format.
Adding QR code for ZATCA in Invoices
Step 1: Navigate to Invoice Settings
Go to Settings → Invoice Settings → Invoice Layout.
Step 2: Enable ZATCA QR Code
In the layout settings, search for ZATCA (or Fatoora).
You will find a checkbox labeled ZATCA (Fatoora) QR Code.
Enable this checkbox.
Step 3: Choose QR Code Phase
Once enabled, a dropdown will appear.
Select either Phase 1 or Phase 2 based on your requirement.
Step 4: Save Settings
Click Save to apply the changes.
Step 5: Generate Invoice
Now, when you create a new Sale, the invoice will automatically include the ZATCA QR code.
NOTE:
For Phase 1, the QR code can be generated without any additional module.
For Phase 2, ensure that the ZATCA module is installed, as it’s required for Phase 2 QR code generation.
App for scanning ZATCA QR code:
Download and Use the app link below for scanning the ZATCA QR code
https://play.google.com/store/apps/details?id=com.posbankbh.einvoiceqrreader&pcampaignid=web_share
Frequently asked questions
1. Does this module use any 3rd party for integration with Zatca portal?
This module works by directly integrating with Zatca API. No 3rd part API is used here.
2. Is there any limit on the number of invoices that can be synced?
No, you can sync unlimited invoices.
Video
Version Log:
Released V1.1, November 21, 2025
- Fixed: Replace unwanted characters with spaces instead of removing them from product’s name.
- Fixed: Resolved issue with symbols being incorrectly removed from ZATCA item names.
- Fixed: Removed business ID from shared invoice for ZATCA QR.
- Fixed: Added proper validation when adding a new contact(customer) as per ZATCA rules.
Released V1.0, October 23, 2025
- FIX: fixed issue related to product name displaying blank in invoices.
Released V0.9, October 16, 2025
- NEW: Added option to select date from which Zatca invoice syncing will start (invoices before that date will not be synced)
- NEW: Added contact address validation in accordance with ZATCA authority rules.
- IMPROVED: Changed some labels for better understanding.
- FIXED: Invoice hash mismatch issue fixed.
Released V0.8, August 18, 2025
- IMPROVED: Handle null ZATCA supplier settings
- IMPROVED: Better error message if sync fails.
- IMPROVED: Added label in add contact Additional number to Additional number/Secondary Number
- IMPROVED: Changed label and added help text in ZATCA onboarding
- IMPROVED: Changed logic for invoice type in ZATCA
- IMPROVED: Added condition on delete/edit according to ZATCA
- IMPROVED: Display amount in current format word in ZATCA module
Released V0.7, April 28, 2025
- New: Added A3 invoice download option
- Some more internal improvements and fixes.
📩 Still stuck? Contact Support